The Classic Lemon Meringue Pie is more than just a dessert; it’s a triumphant trinity of textures and tastes. A buttery, flaky crust provides the foundation for a tart, vibrant lemon custard, all crowned with a cloud of sweet, toasted meringue. Achieving this perfect balance, however, can feel like a complex project, one where a single misstep can lead to a cascade of failures. Much like intricate Software Debugging, baking the perfect lemon meringue pie requires precision, an understanding of the underlying chemistry, and a robust set of Debugging Techniques to troubleshoot common issues.
In this comprehensive guide, we will deconstruct the process of creating a flawless lemon meringue pie, approaching it as a developer would a complex application. We’ll explore the “architecture” of each component—the crust, the filling, and the meringue—and provide expert Debugging Tips for each stage. From preventing a soggy crust to ensuring a stable, weep-free meringue, you’ll learn to think like a “dessert developer,” applying principles of Code Debugging to your culinary workflow. This journey will cover everything from initial setup to final “production deployment,” ensuring your final product is a masterpiece of flavor and structure, free of common bugs and errors.
Architecting the Base: Mastering the Flaky Pie Crust
The crust is the foundation of your entire project. A weak or flawed foundation will compromise everything built upon it. In baking, this means a crust that is either tough, shrunken, or—the most dreaded error of all—soggy. Achieving a perfect crust is the first step in Full Stack Debugging for your pie.
The Initial Setup: Ingredients and Environment Variables
Just as in Python Development or Node.js Development, your initial environment setup is critical. In this context, your “environment variables” are your ingredients and tools.
- Cold Ingredients: The key to a flaky crust is cold, solid fat (butter or shortening) distributed in pea-sized pieces throughout the flour. When the heat hits the crust, the water in the butter turns to steam, pushing the layers of flour apart and creating flaky pockets. If your butter is warm, it will simply melt into the flour, resulting in a tough, greasy crust. Always use ice-cold water and butter straight from the refrigerator.
- The Right Flour: All-purpose flour is generally sufficient, but a mix of all-purpose and pastry flour can yield an even more tender result. The choice of flour is like choosing a library or framework; it affects the final characteristics of your build.
- Minimal Handling: Overworking the dough develops gluten, the protein network that gives bread its chewiness. In a pie crust, too much gluten leads to a tough, leathery texture. This is analogous to inefficient code; the process is overworked, leading to poor performance. Mix the dough just until it comes together.
Common Crust “Bugs” and Bug Fixing Techniques
Even with a perfect setup, bugs can appear. Here’s how to approach the most common crust errors using proven Bug Fixing strategies.
- The Bug: Soggy Bottom. This is the most notorious pie bug. It occurs when the liquid from the filling soaks into the bottom crust, preventing it from crisping up.
- The Fix (Blind Baking): This is the most effective preventative Debugging Technique. Blind baking involves pre-baking the crust before adding the filling. Line the chilled pie shell with parchment paper, fill it with pie weights or dried beans, and bake until the edges are set. Then, remove the weights and parchment and bake for a few more minutes until the bottom is golden. This creates a waterproof barrier. This process is the culinary equivalent of Unit Test Debugging, ensuring the crust “module” functions correctly on its own before integration.
- The Bug: Shrinking Crust. You form a perfect crust, but it shrinks down the sides of the pan during baking.
- The Fix (Resting the Dough): This is usually caused by overworked gluten strands that are too elastic. After fitting the dough into the pan, let it rest in the refrigerator for at least 30 minutes (or up to 2 hours). This allows the gluten to relax. Think of this as a form of Memory Debugging; you’re allowing the system to settle before putting it under stress.
The “Backend” Logic: Crafting a Flawless Lemon Custard
The lemon custard is the heart of the pie—the core logic that defines its character. It needs to be intensely flavorful, perfectly tart, and have a smooth, thick consistency. Any errors here are critical, akin to bugs in your application’s backend server.
Understanding the “API”: The Chemistry of Lemon Custard
The interaction between the ingredients is the “API” of your filling. Understanding it is key to successful Backend Debugging.
- Cornstarch (The Thickener): Cornstarch is a powerful thickening agent, but it must be activated properly. It needs to be brought to a boil to gelatinize and reach its full thickening potential.
- Egg Yolks (The Emulsifier): Yolks add richness, color, and help to thicken the custard. However, they are delicate and can curdle or “scramble” if heated too quickly.
- Lemon Juice (The Acid): The acid provides the signature tartness but can also interfere with the thickening process if not balanced correctly. It’s best to add butter and lemon juice at the end, off the heat, to preserve their fresh flavor and prevent them from breaking down the starch.
JavaScript Errors in the Kitchen: Common Filling Failures
Just like uncaught JavaScript Errors can halt a web page, a filling failure can ruin the entire dessert. Let’s look at common Error Messages from the kitchen.
- The Error: Runny Filling. You slice the pie, and the filling pools out. The Stack Trace for this error almost always points to one cause.
- The Fix (Proper Cooking): The cornstarch wasn’t cooked long enough to activate. The mixture must come to a full, rolling boil for at least one minute. You should see thick, volcanic bubbles. Using a whisk and stirring constantly prevents scorching. This is a crucial step in JavaScript Debugging for your custard; you must allow the asynchronous “promise” of thickening to resolve fully.
- The Error: Scrambled Eggs. The filling is lumpy and tastes eggy.
- The Fix (Tempering): This is a critical Debugging Tip. Never add egg yolks directly to a hot mixture. Instead, temper them. Whisk the yolks in a separate bowl, then slowly pour a small amount of the hot lemon mixture into the yolks while whisking constantly. This gently raises their temperature. Then, you can pour the tempered yolk mixture back into the saucepan. This prevents the proteins from seizing and scrambling.
The “Frontend” Masterpiece: Conquering the Meringue
The meringue is the user interface of your pie—it’s what everyone sees first. It should be glossy, stable, and beautifully browned. Meringue issues are highly visible, making effective Frontend Debugging essential.
French vs. Swiss vs. Italian: Choosing Your Debugging Frameworks
There are several types of meringue, each with its own stability and complexity, much like choosing between React Debugging, Vue Debugging, or Angular Debugging frameworks.
- French Meringue: The simplest. Raw egg whites are whipped with sugar. It’s the least stable and must be baked immediately.
- Swiss Meringue: Egg whites and sugar are gently heated over a double boiler until the sugar dissolves before being whipped. It’s much more stable and glossy than French meringue.
- Italian Meringue: The most stable. A hot sugar syrup is slowly streamed into whipping egg whites. This cooks the whites, resulting in a very stable, marshmallow-like meringue that doesn’t require further baking (though it’s usually torched for color). For lemon meringue pie, Swiss meringue is often the best balance of stability and ease.
Frontend Debugging: Troubleshooting Meringue Meltdowns
A failing meringue can be frustrating. Here’s how to debug the most common issues.
- The Bug: Weeping Meringue. A layer of sticky liquid forms between the meringue and the filling. This is a classic Integration Debugging problem.
- The Fix (Hot Filling & Sealing): This bug has two main causes. First, undissolved sugar crystals can attract moisture and weep. Ensure your sugar is fully dissolved (a key benefit of Swiss meringue). Second, and most importantly, always spread the meringue over a hot lemon filling. This cooks the bottom of the meringue, creating a seal and preventing it from weeping. Also, make sure the meringue touches the crust all the way around to anchor it.
- The Bug: Beading. Tiny, amber-colored droplets of sugar appear on the surface of the meringue.
- The Fix (Don’t Overbake): This is a form of Performance Monitoring error. Beading is caused by over-baking the meringue. The proteins in the egg whites have been overworked and are squeezing out the sugar syrup. Bake just until the peaks are golden brown, no longer.
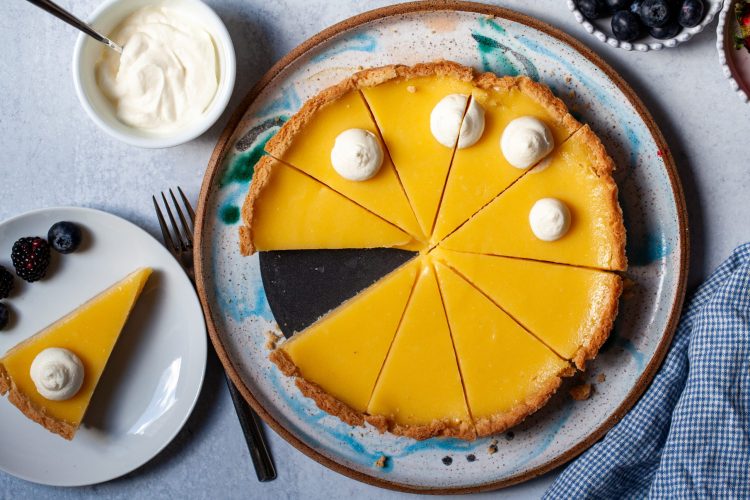
The Ultimate Classic Lemon Meringue Pie Recipe
This recipe incorporates all the “best practices” discussed above to create a stable, delicious, and beautiful pie. Think of this as your final, debugged code, ready for deployment.
Ingredients
For the All-Butter Pie Crust (Pâte Brisée):
- 1 1/4 cups (150g) all-purpose flour
- 1/2 teaspoon salt
- 1 tablespoon granulated sugar
- 1/2 cup (113g) unsalted butter, very cold, cut into 1/2-inch cubes
- 3-5 tablespoons ice water
For the Lemon Filling:
- 1 1/2 cups (300g) granulated sugar
- 1/4 cup (35g) cornstarch
- 1/4 teaspoon salt
- 1 1/2 cups water
- 4 large egg yolks
- 2 teaspoons lemon zest
- 1/2 cup (120ml) fresh lemon juice
- 2 tablespoons unsalted butter, softened
For the Swiss Meringue:
- 4 large egg whites, room temperature
- 1 cup (200g) granulated sugar
- 1/2 teaspoon cream of tartar
- 1 teaspoon vanilla extract
Directions
- Prepare the Crust: In a food processor, pulse the flour, salt, and sugar. Add the cold butter cubes and pulse until the mixture resembles coarse crumbs with some pea-sized pieces of butter remaining. Drizzle in 3 tablespoons of ice water and pulse until the dough just starts to come together. If needed, add more water, 1 teaspoon at a time. Do not overmix. Form the dough into a disk, wrap in plastic, and refrigerate for at least 1 hour.
- Blind Bake the Crust: Preheat oven to 400°F (200°C). Roll out the chilled dough and fit it into a 9-inch pie plate. Trim and crimp the edges. Chill for another 20 minutes. Line the crust with parchment paper and fill with pie weights. Bake for 15-20 minutes. Carefully remove the parchment and weights, and bake for another 5-7 minutes, until the bottom is lightly golden. Set aside. Reduce oven temperature to 350°F (175°C).
- Make the Lemon Filling: In a medium saucepan, whisk together the sugar, cornstarch, and salt. Gradually whisk in the 1 1/2 cups of water until smooth. Bring the mixture to a boil over medium heat, whisking constantly. Boil for 1 minute, until it becomes very thick. Remove from heat.
- Temper the Egg Yolks: In a separate bowl, lightly whisk the egg yolks. Slowly pour about half a cup of the hot sugar mixture into the yolks while whisking vigorously. Pour the tempered yolk mixture back into the saucepan.
- Finish the Filling: Return the saucepan to medium heat and cook, stirring constantly, for 2 more minutes until very thick. Do not let it boil again. Remove from heat and stir in the lemon zest, lemon juice, and butter until the butter is fully melted and the filling is smooth.
- Make the Swiss Meringue: In a very clean, heatproof bowl (the bowl of your stand mixer is perfect), combine the egg whites, sugar, and cream of tartar. Set the bowl over a saucepan of simmering water (a double boiler). Whisk constantly until the sugar has completely dissolved and the mixture is hot to the touch (about 160°F or 71°C on an instant-read thermometer).
- Whip the Meringue: Transfer the bowl to your stand mixer fitted with the whisk attachment (or use a hand mixer). Beat on low speed, gradually increasing to high, until stiff, glossy peaks form, about 5-7 minutes. Beat in the vanilla extract.
- Assemble and Bake: Pour the hot lemon filling into the pre-baked crust. Immediately spoon the meringue over the hot filling, ensuring the meringue spreads to touch the crust on all sides to create a seal. Create decorative swirls and peaks with the back of a spoon. Bake for 10-15 minutes, or until the meringue is golden brown.
- Cool and Serve: Let the pie cool on a wire rack for at least 4 hours to allow the filling to set completely before slicing. This final step is crucial; slicing a warm pie is the ultimate Production Debugging failure.
Conclusion: From Code to Confection
Creating the perfect Classic Lemon Meringue Pie is a rewarding challenge that mirrors the discipline and problem-solving of software engineering. By understanding the “why” behind each step and adopting a mindset of Testing and Debugging, you can overcome common pitfalls and produce consistently excellent results. From the foundational logic of a flaky crust to the user-facing beauty of a stable meringue, every component matters. By applying these Debugging Best Practices—from proper setup and tempering to ensuring a hot filling-meringue integration—you are not just following a recipe; you are executing a well-designed algorithm for dessert perfection. The next time you face a culinary challenge, remember to approach it with the patience and analytical eye of a developer, and you’ll be able to debug your way to delicious success.