“To optimize your capabilities on Google Colab, understanding how to get allocated GPU spec is crucial, as this will significantly boost the performance and efficiency of your machine learning and data processing tasks.”
Steps
Description
Connect to GPU Accelerator
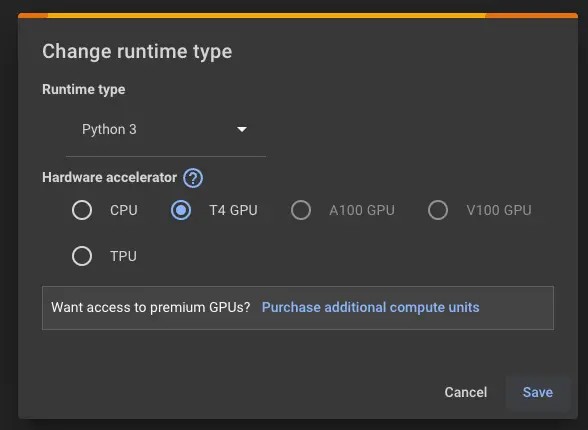
Click on the ‘Runtime’ tab > ‘Change runtime type’. Under ‘Hardware Accelerator’, choose ‘GPU’ and save.
Confirm Connection to GPU
Run the command
!nvidia-smi
in a code cell, if connected well it will display detailed GPU specifications.
Use PyTorch to Unveil More Specs
If you need more detailed info about your GPU capabilities such as CUDA version, use torch utils. Run
from tensorflow.python.client import device_lib; device_lib.list_local_devices()
to get a comprehensive list of all the devices accessible to TensorFlow including GPUs.
Google’s Colaboratory (Colab for short) is a cloud service that provides free access to GPU machines. This is a godsend for someone who needs these resources but cannot afford high-end GPUs. It indeed levels the playing field for everyone to experiment with machine learning applications.
The way to tap into the horsepower of the allocated GPU in Google Colab involves four simple steps.
– First, ensure that you have already connected to the GPU accelerator. This can be done through the interface at ‘Runtime’ > ‘Change runtime type’. A sidebar pop-up will appear, you can then select ‘GPU’ from the dropdown option under ‘Hardware Accelerator’. Click ‘Save’ and you’re good to go.
– You’ll want to confirm this connection by running the command
!nvidia-smi
. When run in a code cell, this command should return details about the GPU you’ve been assigned.
– Additionally, harnessing the pyTorch library you can reveal more about your GPU configuration using relevant commands. Inputting
gives information like the CUDA version which can help you optimize your model accordingly.
– Lastly, if you wish to retrieve a laundry list of every device that TensorFlow has access to, including CPUs and GPUs, the following piece of code will be handy
from tensorflow.python.client import device_lib; device_lib.list_local_devices()
.
With these quick and easy steps, you can gain a snapshot of the GPU specs you were allocated by Google Colab. Such insights help you understand performance limits or any constraints you might experience in your coding journey. It pays to know the tools at your disposal, especially when they’re as high-powered as Google’s Colab resources.To understand Google Colab’s GPU allocation, it’s first important to know what Google Colab is and why it offers such a beneficial resource to programmers and data scientists. Google Colab is a cloud-based Jupyter notebook that allows you to utilize Google’s hardware resources (including GPUs and TPUs) for free or as part of their paid Pro service.
Google’s strategy with this tool seems to be aimed at both the democratization of machine learning (ML) and deep learning technologies, and also as an introduction to their extensive suite of cloud products. The GPUs offered in this partnership are integrated directly into Google’s cloud services, therefore they function seamlessly with other Google Cloud offerings, such as BigQuery for data management and TensorFlow for machine learning.
When it comes to how Google allocates these GPUs within Colab, it’s done by a proprietary method that isn’t published or explicitly communicated to users. However often when you start a new session in Colab, you get allocated a new runtime, which may be assigned different physical GPU based on availability.
To get allocated GPU spec in Google Colab, you can use the
torch
library if you’re using PyTorch, or
nvidia-smi
command to get information about the GPU. This is demonstrated in the following code examples:
# Code snipet for PyTorch
import torch

if torch.cuda.is_available():
    print(torch.cuda.get_device_name(0))

# Code snipet for nvidia-smi command
!nvidia-smi
These commands print out the specification of the available GPU on the system including its name, total memory, and usage information.
It’s critical to note here that algorithms that make heavy use of the GPU may find varying levels of performance on the different types of GPUs provided by Colab, so being able to identify the GPU type in use can assist optimize performance. Also considering the ‘free tier vs pro tier’ allocation difference where free-tier GPU runtimes are subject to higher contention and are more likely to be preempted over time.
For more details on Google Colab and GPU allocation Google Colaboratory FAQs is a helpful resource.Securing a preferred GPU specification on Google Colab is pivotal when running heavy machine learning models. Specific GPUs offer varying levels of computational power and being able to choose your preference can make significant differences in both performance and efficiency. The most powerful GPU currently offered by Google Colab is the Tesla P100 followed by the T4 and K80.
To check the GPU you are allocated with, these lines of code can be used:
import torch
print(torch.cuda.get_device_name(0))
The output will either be ‘Tesla P100-PCIE-16GB’, ‘Tesla K80’ or ‘Tesla T4’.
Unfortunately, Google Colab does not officially provide the option to manually select a specific GPU type but due to allocations based on usage and availability, there are strategies that can be implemented to increase the likelihood of securing a preferred specification. Here are several measures:
1. **Ensure using Google Colab Pro**: Google Colab Pro offers priority access to their highest performing GPUs. These include the Tesla P100 and Tesla T4. This does come at a monthly subscription but it expands the possibilities and increases access to more powerful GPU specifications.
2. **Change the Runtime Type**: Adjusting the runtime type often changes the allocated GPU. Navigate to `Runtime` -> `Change runtime type` and under the `Hardware accelerator` section, choose `GPU`. Run the check again for the allocated GPU model, refresh if desired model is not allocated.
3. **Increase Utilization**: Repeatedly restarting the Colab kernel to get a new allocation is generally discouraged as it could potentially lead to temporary hardware restrictions. Rather aim to maximize utilization of the given kernel which increases the probability of acquiring a more powerful GPU in future sessions.
5. **Monitor GPU performance**: Use google_utils.py to track GPU performance. This allows you to monitor resource consumption and determine the best activities to perform with the current GPU.
6. **Run Heavy Models**: Intensive tasks might trigger an automatic upgrade of the GPU spec by Google Colab’s auto-management system. However, this comes with a risk of notebook disconnection due to high memory use, so tread carefully.
Although these tips aren’t guaranteed methods to secure a preferred GPU, they have been found to effectively enhance the possibility. Remember that Google Colab’s hardware offerings are strongly dictated by server demand, hence absolute control over GPU selection isn’t feasible.
Lastly, it’s important to appropriately select between single and double precision computations. The newer T4s are more efficient at single-precision (FP32) calculations whereas the older P100s excel at double-precision (FP64). Developing an understanding of your computation requirements can help you identify which GPU would serve you best.
If you are using Google Colab for your coding workflows, verifying the allocated GPU’s specifications is vital to ensure you have enough computational power for your tasks. Below I’m going to guide you through implementing a check technique in Python which helps to see information about the GPU such as its Model and Memory.
To obtain GPU spec in Google Colab, it is advisable to use the command-line interface of the Linux system that Colab operates on. We can do this by pitching shell commands directly into the Python cells of the notebook. It’s achieved using an “exclamation mark” (!) at the beginning and then we run the appropriate command.
Firstly, let’s check if a GPU is allocated to your session:
html
# Run the below command:
!nvidia-smi
If text appears indicating the specific model of the GPU, time, driver version, etc., you’re all set; Colab has provided you with a GPU. However, if an error message pops up saying NVIDIA-SMI has failed because no GPU was found, you ought to allocate one manually.
Now, let’s discuss how to check for specifics of the GPU. There are two popular techniques.
1. Using command line utility `nvidia-smi`
html
# Run the below command:
!nvidia-smi --query-gpu=gpu_name,driver_version,memory.total --format=csv
With this command, we query the `nvidia-smi` to provide us specifics about gpu_name, driver_version, and total_memory in csv format.
2. Using Python’s `torch` library
Before proceeding, ensure to import the torch library.
html
# Importing necessary library
import torch
Then you can use the following code to fetch details about the GPU
Here, we leverage `torch.cuda.get_device_properties()` method provides details about the GPU in use.
In this way, you can effortlessly determine crucial GPU specs on Google Colab using either Linux CLI with nvidia-smi or more Pythonic style using PyTorch. These methods give you extensive visibility into the GPU details being utilized within your Google Colab session. Understanding these specifications can assist you in optimizing or even debugging your workflows efficiently. It’s always a good practice to be informed about the resources available to your programs as they can directly impact performance and outcomes for data science projects especially while working with computation-heavy jobs like Machine Learning or Data Visualization.Google Colab Notebooks Official Documentation contains further advanced usage details which could benefit concerted efforts in managing computational resources properly.Surely. Google Colab is rapidly becoming a popular platform for running machine learning and data science experiments due to its free access to GPU resources. However, harnessing these GPUs’ power effectively requires attention to some key settings.
First off, how do we ensure that we have been allocated a GPU by Google Colab? It’s simple! Use the following piece of code:
import tensorflow as tf
device_name = tf.test.gpu_device_name()
if device_name != '/device:GPU:0':
  raise SystemError('GPU device not found')
print('Found GPU at: {}'.format(device_name))
This code snippet queries TensorFlow to check whether a GPU has indeed been allocated, and if so where it can be located.
Google Colab provides three types of runtime environments you can choose from: None (indicating that no hardware accelerator should be used), GPU (to use a single GPU), and TPU. To make sure you’re utilizing the maximum potential of allocated GPUs, modify the runtime type to ‘GPU’. This could be done by clicking on ‘Runtime’ > ‘Change runtime type’ > ‘Hardware Accelerator’ dropdown menu > select ‘GPU’.
But you may ask: “I wonder what kind of GPU I was allocated?” Well, there’s good news! You can probe this information using nvidia-smi command wrapped inside ! . Here’s the syntax:
!nvidia-smi
What more, Google Colab’s GPUs have memory limits and sharing policies in place to distribute computing power among users fairly. As such, your computations might get killed if they are too memory-intensive, or if your usage significantly outweighs others’. Although we cannot directly influence Colab’s underlying management mechanisms, choosing an appropriate batch size for training runs could potentially maximize GPU usage. If the model is too large or the batch size is too big to fit into the GPU memory, you’ll likely encounter Out-of-Memory (OOM) errors.
Furthermore, asynchronous loading of your data onto the allocated GPU through methods such as tf.data API’s prefetch function can help optimize resource utilization. This method allows your CPU to prepare upcoming data while your GPU works on the current batch of data dispatching, leading to decreased idle time and better overall performance.
To reference the official Colab documentation click here. It offers comprehensive guides and tips on getting the most out of Google Colab.
Remember, strategic tweaking of Google Colab settings, being mindful of its GPU limits and fair use policies, and employing smart data loading techniques will enable optimal GPU allocation and utilization, thereby elevating your coding experiments to new heights.
I’m thrilled to share with you the way to determine allocated and free memory of your GPU spec in Google Colab. This gives you valuable knowledge regarding the resources available for your AI or machine learning workloads, ensuring you make the best use of Google Colab’s capabilities.
Firstly, it’s vital to understand that Google Colab offers a relatively easy-to-use interface where you can successfully run your code on powerful GPUs (Graphical Processing Units) for free. Checking the allocated GPU spec becomes extremely crucial when dealing with compute-intensive applications such as deep learning models.
To check the specifications of the allocated GPU, Google Colab provides an indispensable magic command
gpu_info
. Here’s how:
!nvidia-smi
By running this simple command within your notebook cell, you can easily display information related to the characteristics of the GPU currently assigned to the Colab session. Some of these details include the name of your GPU, total memory, and memory used.
The
!nvidia-smi
command fetches comprehensive hardware information, so it also caters to displaying GPU memory usage. The output contains a section about memory usage displaying ‘MiB / MiB’. The value left to the slash indicates the used memory, whereas the value right to the slash represents the total amount available.
Here is a sample output:
+-----------------------------------------------------------------------------+
| NVIDIA-SMI 465.19.01    Driver Version: 460.32.03    CUDA Version: 11.2     |
|-------------------------------+----------------------+----------------------+
| GPU  Name        Persistence-M| Bus-Id        Disp.A | Volatile Uncorr. ECC |
| Fan  Temp  Perf  Pwr:Usage/Cap|         Memory-Usage | GPU-Util  Compute M. |
|                               |                      |               MIG M. |
|===============================+======================+======================|
|   0  Tesla K80           Off  | 00000000:00:1E.0 Off |                    0 |
| N/A   48C    P8    30W / 149W |      0MiB / 11441MiB |      0%      Default |
|                               |                      |                  N/A |
+-------------------------------+----------------------+----------------------+

+-----------------------------------------------------------------------------+
| Processes:                                                                  |
|  GPU   GI   CI        PID   Type   Process name                  GPU Memory |
|        ID   ID                                                   Usage      |
|=============================================================================|
|  No running processes found                                                 |
+-----------------------------------------------------------------------------+
With the details displayed, you can quickly glance at ‘Memory Usage’ to ascertain the total memory and the part of it being used by current processes.
In the given output, checking the ‘Memory-Usage’ row reveals that out of 11441MiB of total GPU memory, none is currently being used. Thus, all the GPU memory is free for new processes.
Familiarizing yourself with this method allows smoother optimization of your code based on available resources, which is a general practice done by professional programmers.
Finally, be sure to remember that Google Colab offers different types of GPUs based on availability, and the memory could vary. A recommended read on various aspects of GPU programming can be found here.
Keep coding and exploring!In the realm of technologies that support high-performance computing, Google Colaboratory (Colab for short), emerges as a favored tool for machine learning and data science enthusiasts. Known for its free-of-charge, GPU-based research tool, it turns every laptop into a supercomputer. However, to maximize performance, one needs to align their project with the appropriate GPU (Graphics Processing Unit) specification. In this discussion, I’ll highlight ways to squeeze the most performance out of your allocated Google Colab GPU and provide insights on how to acquire such information from the Colab environment.
Google Colab offers you one of three possible NVIDIA GPUs: Tesla K80, T4, or P100. The one assigned to you depends on demand and availability. Different projects will perform optimally with different GPU specifications, depending on resource intensity, compute requirements, and complexity of computations. Learning how much resource you’re using and what kind you have been allocated is fundamental in balancing workload and performance optimization.
Firstly, let’s delve into understanding the total amount of GPU memory at hand. You might be interested in knowing how much of it’s being consumed throughout your project. To accomplish this, we can leverage Google Colab’s built-in command line interface. Below is a quick way to display the GPU memory usage:
!nvidia-smi
On execution, this outputs several specs, including but not limited to the GPU name, total memory, and used memory. This helps you keep tabs on memory usage and manage your resources effectively.
Secondly, you might want a detailed overview of the GPU type assigned to you by Google Colab. For advanced telemetry like the GPU capabilities, usage, temperature and fan speed, we utilize pynvml, a Python library that gives us programmatic access to NVIDIA’s Management Library (NVML). Here’s an illustrative code snippet to display those details:
With this piece of code, you should be able to get more detailed information about the specific GPU running your notebook.
To make the most out of your GPU allocation on Google Colab, remember these golden rules:
– Make sure your computations are parallelizable to take full advantage of the massive number of cores in the GPUs.
– Avoid operations that require frequent communication between the CPU and GPU, as transfer rates between these two can be a bottleneck.
– Constantly monitor and adjust your GPU memory usage to preemptively avoid out of memory errors.
Google Colab is an incredibly powerful tool for performing data analysis and training machine learning models. By staying aware of your active GPU specs, mindfully managing resources, and optimizing workflows, you are assured of a seamless, productivity-focused experience where performance is barely compromised.Sure, let’s dive right into unraveling how to work around limitations by rotating between different GPU specs on Google Colaboratory, while also figuring out how to get allocated GPU spec in Google Colab.
Initially, you might want to check the type of GPU being allocated to your session. Since Google provides free access, they typically allocate lower-grade GPUs, and these levels greatly fluctuate based on the availability of resources. Checking the GPU type can be accomplished using a few lines of code:
!nvidia-smi
Now, suppose you discover that you’re assigned an undesired GPU spec. Here’s where rotation between different GPU specs comes in handy. Below are outlined steps for changing the GPU spec:
1. Disconnect From the Current Session:
This is the first step towards rotating GPU specifications. You can do this manually by clicking on ‘Runtime’ -> ‘Manage Sessions’ -> ‘Terminate’. Alternatively, you use this command to disconnect:
from IPython.display import display, Javascript
def force_disconnect():
  display(Javascript('google.colab.kernel.disconnect();'))
force_disconnect()
2. Connect to New Session:
After you’ve successfully disconnected from the current session, it’s time to connect to a new session. Simply click on ‘Connect’ at the top-right corner of your notebook.
Take note that Google Colab randomly assigns GPU based on availability, so there isn’t a guarantee that you’ll get a specific type of GPU every time you disconnect and reconnect. If the GPU assigned after following the above process isn’t what you require, repeat these steps until you land the desired GPU spec.
Remember, the goal here is not to abuse the system but use it judiciously, bearing in mind that Google ColabPro users have priority access.
Something else worth mentioning is always keeping track of how much of your GPU is being used. Prolonged usage may hamper execution or lead to disconnection, so keep an eye out to avoid surprises:
This snippet will return detailed information about the free and utilized memory on your current GPU.
In short, alternating between GPU specs is a practical way to leverage the flexible offerings provided by Google Collaboratory. To stay within the fair usage policy, consider upgrading to Colab Pro if you frequently require high-spec GPUs. Here is more about Google Colab Pro. Nonetheless, remember to keep tabs on your GPU spec allocation, as with careful management, Google Colab provides robust tools that can adequately support various data science workflows.As a dedicated programmer, getting to know the allocated GPU spec in Google Colab is immensely beneficial for managing and optimizing your machine learning model or any intensive computation task.
To acquire this information, we seek help from TensorFlow, a widely used open-source platform that supports a broad spectrum of tasks and comprehends an efficient data representation. Here’s how you can check your GPU specifications using TensorFlow:
import tensorflow as tf
device_name = tf.test.gpu_device_name()
if device_name != '/device:GPU:0':
  raise SystemError('GPU device not found')
print('Found GPU at: {}'.format(device_name))
This piece of code first checks whether a GPU is available. If no GPU is found, it throws an error. If a GPU is available, it prints the path to the GPU. This way ensures you are able to specify if GPU allocation is available to you.
PyTorch users also have the option to elucidate GPU details. You would be implementing the following snippet for PyTorch:
import torch
print(torch.cuda.get_device_name(0))
Running this module would provide you with the name of your GPU, which can assist in further performance optimization assuming different GPUs might perform differently on various tasks.
Understanding GPU specs can come handy when dealing with cloud-based computing platforms such as Google Colab. With the increasing demand for machine learning, deep learning applications, and cloud-based IDE, knowing the intricacies of your infrastructure will always stand you in good stead. Employing these methods, you can gain valuable insights into your architecture and enhance your efficiency.
For more detailed information about profiling and monitoring your GPU device, NVIDIA’s management library (NVML) documentation offers comprehensive guidelines.
While this article focused on Google Colab, these principles apply to other cloud-based IDEs that support Python and have access to a GPU. As machine learning evolves, understanding these environments becomes a critical part of optimising your workflow.