


| Steps | Description |
|---|---|
| Update System Packages | Start by updating system packages. This can be achieved with the command:
sudo apt update && sudo apt upgrade -y |
| Python Installation | If Python isn’t installed, issue the command:
sudo apt install python3 |
| PIP Installation | To quickly and easily install pip, securely download get-pip.py by following this link, then run the following:
sudo python3 get-pip.py |
| Installation Verification | Verify by running:
pip3 --version . If successful, the version of pip installed will be displayed. |
In the summary table presented above, a simplified guide on how to install Python3-Pip on Ubuntu 20.04 is illustrated. Each critical step is broken down into four key steps with their respective instructions.
Getting started, it’s essential to always keep your system up-to-date before installing new software packages. In our case, the objective is to install Python3-Pip, thus we execute
sudo apt update
and
sudo apt upgrade -y
commands to update the system packages.
The next step involves confirming if Python3 is installed in your system. If not installed, Python3 can be added through the command
sudo apt install python3
.
Once Python3 installation is confirmed, the third step is to facilitate the actual installation of Pip. A secure link is provided here where you can download the get-pip.py script. After downloading, you can run it using
sudo python3 get-pip.py
, which allows pip to be installed within the Python environment in your machine.
Lastly, a confirmation step is carried out to ascertain whether Python3-Pip has been successfully installed. This is done by issuing the command
pip3 --version
. On successful installation, this will output the version of pip that’s currently installed. This signifies that Python3-Pip has been successfully installed on your Ubuntu 20.04.
Python3-Pip is essentially an essential utility for every Python developer to have installed, especially on Ubuntu 20.04 systems. This command-line tool incredibly simplifies the process of downloading and managing Python packages from PyPi (Python Package Index), which is a repository hosting millions of different software developed by the global Python community.
One fundamental thing about Pip is its versatility. Whether you are looking to install a new Python library such as NumPy or Pandas, or just trying to get the latest Django version for your website, Python3-Pip has got you covered.
Furthermore, realize that many of these Python libraries greatly streamline several programming tasks. For instance, Requests will handle HTTP requests way easier than using Python’s built-in urllib, while BeautifulSoup can be used to parse HTML and XML documents with ease.
If the reasons above don’t ensure you’re sold at Python3-Pip, then consider this: it becomes your problem solver when installing Python packages not currently available in the Ubuntu package manager.
Now, here is how we would go about installing Python3-Pip on Ubuntu 20.04 if it does not come pre-installed:
Open your terminal, and first, update your packages list:
sudo apt update
Next, you will want to install Python3-Pip using the following command:
sudo apt install -y python3-pip
You might additionally want to verify your installation by checking the Pip version:
pip3 --version
This should print out some information about your Pip version.
Don’t forget that Pip’s official documentation serves as a comprehensive resource providing more details about operating the utility, upgrading packages, uninstalling, and plenty more.
Having Python3-Pip installed elevates your Python development experience since it ensures easy access to vast PyPi libraries. An improved coding journey, hassle-free package management, and being capable of staying in the loop with the newest Python updates are just a few exclusive benefits you gain when this tiny but powerful tool is part of your toolkit.Before diving into the process of installing Python3-Pip on Ubuntu 20.04, it’s essential that you note some key requirements. You’ll need to check off these requirements to ensure a smooth and successful installation. These are:
1. A non-root user with sudo privileges
2. The latest version of Python installed.
3. An apt package handler tool
4. Updated system packages
Firstly, to install Linux software successfully, your user account should possess sudo privileges. This simply means that your user can perform tasks that require administrative permissions.
The command snippet below showcases how you would add sudo privileges to a user, named ‘exampleuser’ in this case:
sudo usermod -aG sudo exampleuser
Second, as at the time of writing this piece, Python3 is the latest major Python release. Hence, it’s recommended to have it installed on your operating system before proceeding with Python3-pip. Here’s a concise guide on how to get Python3 on Ubuntu 20.04.
An apt package handling utility is another requirement for this guide — luckily it comes pre-installed in most Ubuntu versions. If for any reason it isn’t present in your setup, the code snippet below will install it:
sudo apt update
sudo apt install apt
Lastly, the general health of your Ubuntu machine influences the success of installing new software. Regular system updates help keep your packages up-to-date and well-equipped for new installations. Use this simple command-line script to update all your Ubuntu 20.04 packages:
sudo apt update && sudo apt upgrade
Putting these factors in place guarantees an unproblematic installation of Python3-pip. They provide a perfect environment for our target software and eliminate most of the potential issues we could encounter while installing it.
Let’s proceed with the actual installation. To install pip for Python 3 on Ubuntu 20.04, we only need to run a single command.
sudo apt install python3-pip
In no time, you should have Pip working on your Ubuntu machine. You can confirm this by checking for the installed version with:
pip3 --version
This concludes our discussion on the prerequisites and the actual process of installing Python3-Pip on Ubuntu 20.04 – from ensuring sudo privileges for the installation user account, through having Python3 and the apt package handling utility ready, to finally putting the icing on the cake (Python3-pip).Python3-Pip is an essential tool when working with Python. It’s a package manager that can be utilized for installing specific packages required for your project. If you’re working on Ubuntu 20.04, here are the steps to download and install Python3-Pip.
Please note:
Before commencing installation of Python3-Pip, ensure that Python3 is already installed on your system. You can confirm this by inputting the following command in your terminal:
python3 --version
If Python3 is not available, it would have to be installed prior to installing Python3-Pip.
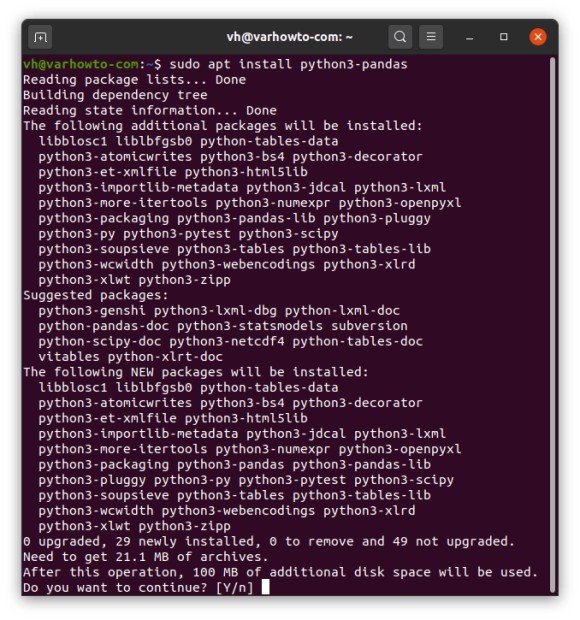
A. Updating the package list
Primarily, we need to update the package list in our system’s repository. This is important to make sure we have access to the latest upgrades available.
sudo apt update
B. Installing Python3-pip
To download and install Python3-Pip, use the command:
sudo apt install -y python3-pip
The “-y” flag auto-accepts the action required for the installation process.
C. Verifying Installation
Post the successful installation of pip for Python3, we need to verify if it was successfully installed.
Use this command:
pip3 --version
You should see output similar to ‘pip 24.1.1 from /usr/lib/python3/dist-packages/pip (python 3.8)’, confirming that pip for Python3 has been installed.
With these steps, Python3-Pip should now be running on your Ubuntu 20.04 machine, ready to be utilized for package management for your Python projects.
Always Remember:
Although Pip did come with earlier versions of Python, it doesn’t automatically get installed with Python3. So it becomes necessary to install Python3-Pip separately. Moreover, as good practice, always keep your Python packages updated using Python3-Pip.
Here’s how you can achieve that:
pip3 install --upgrade pip
By regularly performing the above ‘update’ command, you ensure that your installed Python packages remain up-to-date.
Reference:
For more information regarding Python-Pip, kindly refer to its official documentation. Don’t forget to explore more about the plethora of packages that can be managed using Python3-Pip. Happy coding.Sure, installing Python3-Pip on Ubuntu 20.04 isn’t always a straightforward task, and sometimes you may face challenges that could potentially hold up your project. Here’s an in-depth look at how to navigate these basic installation challenges, keeping it relevant to installing Python3-Pip on Ubuntu 20.04.
Firstly, Python3-Pip is an essential tool used by the Python community for installing and managing Python packages. However, when dealing with package management in a Linux environment such as Ubuntu, you might encounter several challenges. Your first course of action should be updating system packages prior to Pip3 installation:
sudo apt update
sudo apt upgrade
The command
sudo apt update
helps in resyncing the package index files from their sources via Internet while
sudo apt upgrade
fetches new versions of packages existing on the machine ensuring you have the most recent updates.
Next up, install Python3 and its software properties:
sudo apt install python3
sudo apt install software-properties-common
This ensures you have the Python3 interpreter installed and resolves the missing `software-properties-common` error that some users face during Pip3 installation.
Once done, here is how you can normally install pip for Python3:
sudo apt install python3-pip
Yet, this doesn’t always go smoothly, as you may encounter an E: Unable to locate package Python3-Pip error. This error happens because the package is referred to as python3-pip, not Python3-Pip (case-sensitive). Run the command again paying attention to case sensitivity.
Another challenge might be ‘pip’ command not found even after successful installation. Here, it could be that your path variable hasn’t been set properly. You may verify by running:
echo $PATH
If the output doesn’t include ‘/usr/local/bin’, do add it:
export PATH=$PATH:/usr/local/bin
Now you should be able to run ‘pip’ command without any problem.
Should you still encounter issues, you might need to explicitly call pip3 instead of pip.
Remember, Python uses PIP as the repository for software and packages. If you find Pip3 isn’t installed on your system, chances are Python3 also isn’t installed or properly set up. So, in such cases, ensure proper Python setup before moving on to Pip3.
Equipped with this knowledge, you’re now ready to tackle the basic installation challenges of Python3-Pip on Ubuntu 20.04. Remember, understanding the underlying errors and knowing the correct commands will enable you to overcome most obstacles. Lastly, refer to Ubuntu’s Official Documentation for [Ubuntu 20.04] and Python’s Official [Python Website] for detailed information and troubleshooting tips to help you along the way.
Let’s delve into the subject of maintaining and upgrading your installed Python3-Pip packages on Ubuntu 20.04 system in a responsible manner. Effective management and upkeep of software packages avoid potential vulnerability risks and ensures optimum output from the software.
After the installation of Python3-Pip, it’s significant to keep the package updated. The
upgrade
command in Pip allows this easily. Here is how you do it:
pip3 install --upgrade package-name
The code sample above will upgrade the specific
package-name
to its latest version available in the Pip repository. Replace
package-name
with the package you wish to upgrade.
There are scenarios when developers need to manage multiple versions of the same Python libraries for different projects. In such cases, it’s preferable to use Python Virtual Environments which isolate the project environment and minimize conflicts.
Python3’s standard distribution in Ubuntu 20.04 includes
venv
module to create these virtual environments. Let’s say you have a project in directory /home/user/my_project. Navigate to the project’s root directory and run these commands:
python3 -m venv env
source env/bin/activate
The first line creates a new isolated environment named “env”. The second line activates this environment. Now you can install or upgrade any package using pip without affecting other projects or system-wide libraries.
Another key focus of responsibly managed systems is to remove unused or obsolete packages. In Python-Pip, the uninstallation command is fairly straightforward:
pip3 uninstall package-name
Replace
package-name
with the package you want to remove.
In terms of maintenance, it’s beneficial to check for outdated packages occasionally. For Pip users,
pip list --outdated
returns a list of all installed packages with an older version.
pip3 list --outdated
This command indicates if there are newer versions available for your installed packages. Consult the documentation or release notes before deciding to upgrade, as newer isn’t always better.
Stability and ease of rollback are emphasized aspects for a responsibly managed system. It’s good practice to keep track of the versions of packages that your project relies on. This can be accomplished via a requirements.txt file. To generate this file, navigate to your project directory and run:
pip3 freeze > requirements.txt
This creates a file listing out all the currently installed packages along with their exact versions. In case of a system failure or a necessity to replicate the environment, one can simply run pip install -r requirements.txt to install the precise set of packages listed in the file.
In summary, a responsibly managed Python3-Pip system on Ubuntu 20.04 involves staying updated with recent upgrades, removing redundant packages, managing isolated environments, and keeping a record of the existing system state for effortless rollbacks or replication.Troubleshooting common issues with Python3-Pip installation on Ubuntu 20.04 is an essential skill every coder needs. Let’s delve into some practical tips.
Python3-Pip Not Found or Has Not Been Installed
When you run
pip3
in the terminal and get an error such as ‘pip3: command not found,’ it means pip for Python 3 is either not installed or not accessible via your PATH environment variable.
1. First, check if it’s installed by typing
python3 -m pip --version
in the terminal. If you see a version number, pip3 is installed but not added to PATH.
2. To install it, run
sudo apt update
followed by
sudo apt install python3-pip
.
3. If it is already installed, add it to your PATH using
export PATH=$PATH:/path/to/pip3
. Replace ‘/path/to/pip3’ with the actual path.
Can’t Install Pip Packages Due To Permission Errors
If you’re trying to install Python packages using pip and getting permission errors, this is most likely because you are not running the command as root user.
1. You can solve this issue by prefixing the
pip3 install
command with
sudo
. For example:
sudo pip3 install
.
Running Into SSL/TLS Certificate Errors
Sometimes you might encounter SSL or TLS certificate errors when trying to install packages. This could be due to outdated certificates or wrong system timestamps.
1. Update your system’s time by running these commands one after the other:
timedatectl set-ntp off
and then
timedatectl set-ntp on
2. Check your certificates package. On Ubuntu, this is the ca-certificates package. Run
sudo apt update && sudo apt upgrade ca-certificates
to update it.
ModuleNotFoundError or ImportError
If you are facing ModuleNotFoundError or ImportError even after successfully installing the package, the package might be located in a directory that’s not included in the sys.path variable.
1. Find the installation path with
pip3 show
. The output will include the package location.
2. Add the directory to sys.path at runtime with
import sys
and then
sys.path.append('/path/to/package')
Pip Version Conflict Between Python 2 and Python 3
Having both Python2 and Python3 may lead to issues as ‘pip’ might refer to pipfor Python2 by default.
1. Use
pip3
instead of
pip
to avoid confusion between Python2 and Python3.
2. Alternatively, make Python3 your default Python version. Be cautious, this may affect apps and scripts relying on Python2.
Remember, break down the problem step by step to understand what’s causing it. Don’t hesitate to dig deeper into official Python documentation and community forums like StackOverflow. Your solutions will lie within those lines of code or system setups waiting for your keen eye. It’s all part of becoming a proficient coder. Happy troubleshooting!
Ubuntu is one of the most utilized Linux-based operating systems, providing an impressive range of software availability and scope for customization. However, when enhancing your development with Python on Ubuntu, there’s no overlooking the significance of pip, a critical package management system used to install and manage Python packages.
pip
authenticates Python’s reputation as an optimal language for beginner programmers due to its ability to simplify installation of other Python software. It’s clarity and effectiveness permeate into aspects like dependency handling. Consequently, this ubiquitous manageability substantially impacts developer productivity positively.
Please refer below for how to install Python3-pip on Ubuntu 20.04:
Step 1: You must start by updating the APT (Advanced Package Tool) package list. Open the terminal and run the following commands: