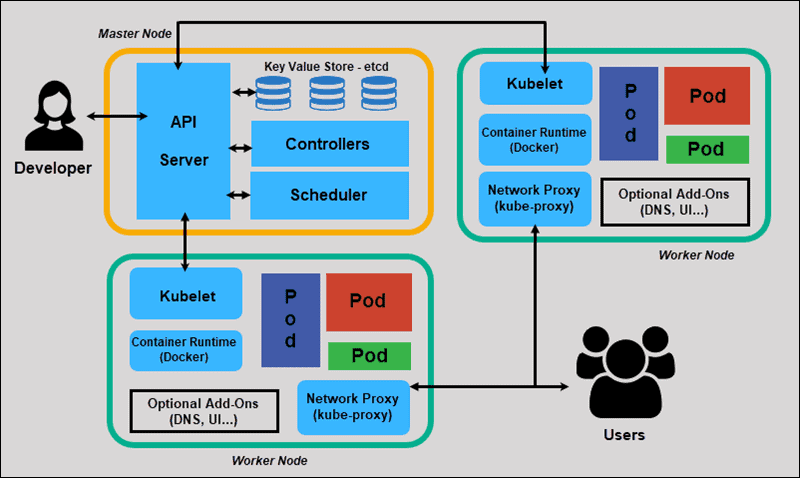
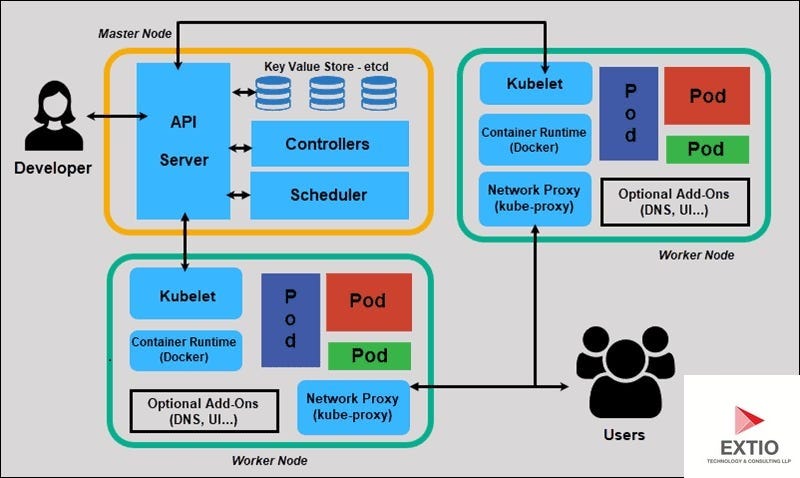
Kubernetes has become the de facto operating system for the cloud, orchestrating containerized applications with remarkable efficiency. However, the abstraction layers that make Kubernetes powerful also introduce significant complexity when things go wrong. Unlike traditional monolithic architectures where you might SSH into a single server to check logs, Kubernetes Debugging requires a distributed mindset. You are not just debugging code; you are debugging the interaction between containers, nodes, networks, and the control plane.
For developers and DevOps engineers, mastering the art of troubleshooting in a cluster is essential. Whether you are dealing with Microservices Debugging, resolving Docker Debugging issues within pods, or analyzing complex System Debugging failures, the approach must be methodical. Issues can stem from application logic (requiring Python Debugging or Node.js Debugging skills), resource constraints, network policies, or scheduler misconfigurations.
This comprehensive guide explores the depths of troubleshooting Kubernetes clusters. We will move beyond basic kubectl logs to explore advanced strategies, ephemeral containers, and the nuances of scheduling logic. By the end of this article, you will possess a robust toolkit for Production Debugging and Error Monitoring in cloud-native environments.
Section 1: Core Concepts of Pod Lifecycle and Failure Analysis
The fundamental unit of deployment in Kubernetes is the Pod. When an application fails, it usually manifests as a Pod failing to reach the Running state. Understanding the Pod lifecycle is the first step in effective Application Debugging. The three most common failure states you will encounter are Pending, ImagePullBackOff, and CrashLoopBackOff.
Diagnosing Startup Failures
A Pending state often points to Kubernetes Debugging at the scheduler level. It means the scheduler cannot find a node that satisfies the Pod’s requirements (CPU/Memory requests, Taints/Tolerations, or Affinity rules). Conversely, CrashLoopBackOff usually indicates that the application inside the container is starting but immediately exiting. This is where Stack Traces and Error Messages become critical.
To diagnose these issues, the kubectl describe command is your primary tool for Static Analysis of the cluster state. It reveals events that explain why a container was killed or why it cannot be scheduled.
Below is a practical example of a Bash script that automates the retrieval of logs and description data for all pods in a non-running state. This is a form of Debug Automation that can save time during an incident.
#!/bin/bash
# troubleshoot_pods.sh
# Automates gathering debug info for failing pods

NAMESPACE=${1:-default}

echo "Analyzing non-running pods in namespace: $NAMESPACE"

# Get all pods that are not in 'Running' state
FAILING_PODS=$(kubectl get pods -n $NAMESPACE --field-selector=status.phase!=Running -o jsonpath='{.items[*].metadata.name}')

for POD in $FAILING_PODS; do
    echo "---------------------------------------------------"
    echo "Inspecting Pod: $POD"

    # Check for previous termination reasons (useful for CrashLoopBackOff)
    echo ">>> Previous Container Logs:"
    kubectl logs $POD -n $NAMESPACE --previous --tail=20 2>/dev/null || echo "No previous logs found."

    # Get Events related to the Pod
    echo ">>> Pod Events:"
    kubectl describe pod $POD -n $NAMESPACE | grep -A 10 "Events:"

    # Check for OOMKilled status specifically
    IS_OOM=$(kubectl get pod $POD -n $NAMESPACE -o yaml | grep -c "OOMKilled")
    if [ $IS_OOM -gt 0 ]; then
        echo "!!! ALERT: Pod was terminated due to Out Of Memory (OOM) !!!"
    fi
done
In the script above, we specifically look for the --previous flag in logs. This is crucial for Code Debugging because if a container crashes instantly, the current log stream might be empty. The previous instance holds the Stack Trace of the fatal exception.
Section 2: Network and Service Discovery Implementation
Once your Pods are running, the next layer of complexity is Network Debugging. Kubernetes relies heavily on DNS (CoreDNS) and software-defined networking (CNI plugins). A common scenario in Microservices Debugging is when Service A cannot talk to Service B. This often manifests as timeouts or “Connection Refused” errors.
Artificial intelligence analyzing image – Convergence of artificial intelligence with social media: A …
Validating Internal Connectivity
Debugging networking issues requires verifying that DNS resolution works and that TCP connections can be established. Since many modern container images (distroless) lack basic tools like curl or ping, you often need to deploy a dedicated debug pod. However, if you are developing a Python-based microservice, you might want to integrate a health-check script.
Here is a Python script designed to be run as a Kubernetes Job or within a debug pod to test internal service discovery and connectivity. This leverages Python Debugging techniques to validate the cluster network.
import socket
import sys
import time
import requests

def check_service_dns(service_name, port):
    """
    Validates DNS resolution and TCP connectivity to a K8s Service.
    """
    print(f"DEBUG: Attempting to resolve {service_name}...")
    try:
        ip_address = socket.gethostbyname(service_name)
        print(f"SUCCESS: Resolved {service_name} to {ip_address}")
    except socket.gaierror as e:
        print(f"ERROR: DNS resolution failed for {service_name}: {e}")
        return False

    print(f"DEBUG: Testing TCP connection to {ip_address}:{port}...")
    sock = socket.socket(socket.AF_INET, socket.SOCK_STREAM)
    sock.settimeout(5)
    result = sock.connect_ex((ip_address, int(port)))
    sock.close()

    if result == 0:
        print(f"SUCCESS: Port {port} is open on {service_name}")
        return True
    else:
        print(f"ERROR: Port {port} is closed or unreachable (Errno: {result})")
        return False

def check_http_endpoint(url):
    """
    Performs an HTTP GET request to check application health.
    """
    try:
        response = requests.get(url, timeout=5)
        print(f"HTTP STATUS: {response.status_code}")
        print(f"RESPONSE HEADERS: {response.headers}")
    except requests.exceptions.RequestException as e:
        print(f"HTTP ERROR: {e}")

if __name__ == "__main__":
    # Example usage: python debug_net.py my-service.default.svc.cluster.local 80
    if len(sys.argv) < 3:
        print("Usage: python debug_net.py  ")
        sys.exit(1)

    target_svc = sys.argv[1]
    target_port = int(sys.argv[2])

    if check_service_dns(target_svc, target_port):
        check_http_endpoint(f"http://{target_svc}:{target_port}/health")
This script is valuable for API Debugging. If DNS fails, you know the issue lies with CoreDNS or the node’s resolv.conf. If DNS works but TCP fails, you are likely looking at a NetworkPolicy blocking traffic or a Service selector mismatch. These are common pitfalls in Backend Debugging within distributed systems.
Section 3: Advanced Techniques: Ephemeral Containers and Scheduling
As Kubernetes environments mature, security practices often dictate the use of “distroless” images—container images stripped of shells and package managers. While excellent for security, this makes Remote Debugging via kubectl exec nearly impossible. This is where Ephemeral Containers come into play.
Using Ephemeral Containers for Live Debugging
The kubectl debug command allows you to attach a temporary container with a full toolkit (like busybox or alpine) to a running Pod. This container shares the process namespace of the target, allowing you to debug processes, inspect files, and analyze network traffic of the target container without restarting it. This is a game-changer for Production Debugging.
Furthermore, understanding advanced scheduling is vital. If you are building custom controllers or using advanced placement logic, you might encounter issues where Pods are technically “schedulable” but land on the wrong nodes due to plugin interference. While we won’t dive into writing scheduler plugins here, debugging the result of scheduling decisions is critical.
Here is an example of how to use kubectl debug to troubleshoot a Java application that is unresponsive, utilizing Java tools for diagnosis.
# Scenario: A Java pod 'payment-service-x8z' is unresponsive but running.
# The image is distroless, so we cannot 'exec' into it.

# Step 1: Attach a debug container sharing the target's process namespace
kubectl debug -it payment-service-x8z \
  --image=nicolaka/netshoot \
  --target=payment-container \
  --share-processes \
  -- bash

# INSIDE THE DEBUG CONTAINER:
# Since we share the process namespace, we can see the Java process
ps aux | grep java

# We can use network tools (netshoot image has them all)
netstat -tulpn

# If we were debugging a Node.js app, we could send signals
# kill -SIGUSR1  (Triggers Node.js debugger inspection)

# For Java, if we mounted the JDK tools, we could take a thread dump
# jstack  > /proc/1/root/tmp/thread_dump.txt
This technique is applicable across languages. For Node.js Debugging, you can send signals to trigger heap dumps. For Go applications, you might attach a debugger like Delve if the capabilities allow. This method bridges the gap between Local Debugging comfort and Remote Debugging necessity.
Debugging Resource Constraints
Artificial intelligence analyzing image – Artificial Intelligence Tags – SubmitShop
Another advanced aspect is Memory Debugging. Kubernetes will kill containers that exceed their memory limits (OOMKilled). However, sometimes the limit is enforced by the language runtime, not the cgroup. For example, a Java application might throw an OutOfMemoryError inside the JVM without the container crashing immediately. In this case, Log Analysis is your only friend unless you have configured Error Tracking tools like Sentry or Datadog.
Section 4: Best Practices and Optimization
Reactive debugging is necessary, but proactive observability is better. To minimize the time spent on System Debugging, you must implement a robust observability stack. This involves centralized logging, metrics, and distributed tracing.
Implementing Structured Logging
Whether you are doing JavaScript Development or Python Development, your logs must be structured (JSON). Unstructured text logs are difficult to query in tools like Elasticsearch or Loki. Structured logs allow you to filter by correlation_id, user_id, or error_code, significantly speeding up Bug Fixing.
Liveness and Readiness Probes
Misconfigured probes are a common source of “restart loops.” A Liveness probe kills the container if it fails, while a Readiness probe stops traffic from reaching it. If your application takes a long time to warm up (common in Java or huge Monoliths), a tight Liveness probe will kill it before it starts. Always configure initialDelaySeconds generously.
Artificial intelligence analyzing image – Artificial intelligence in healthcare: A bibliometric analysis …
Here is a configuration example for a robust Go application deployment, incorporating Debugging Best Practices directly into the YAML.
apiVersion: apps/v1
kind: Deployment
metadata:
  name: order-processor
spec:
  replicas: 3
  selector:
    matchLabels:
      app: order-processor
  template:
    metadata:
      labels:
        app: order-processor
    spec:
      containers:
      - name: main-app
        image: my-registry/order-processor:v1.2
        # Best Practice: Set resource requests/limits to avoid scheduling issues
        resources:
          requests:
            memory: "64Mi"
            cpu: "250m"
          limits:
            memory: "128Mi"
            cpu: "500m"
        # Liveness Probe: Restarts the pod if dead
        livenessProbe:
          httpGet:
            path: /healthz
            port: 8080
          initialDelaySeconds: 15
          periodSeconds: 20
        # Readiness Probe: Removes from Service endpoints if overloaded
        readinessProbe:
          httpGet:
            path: /ready
            port: 8080
          initialDelaySeconds: 5
          periodSeconds: 10
        # Environment variables for enabling verbose logging only when needed
        env:
        - name: LOG_LEVEL
          value: "info" # Change to 'debug' for detailed Code Analysis
By separating Liveness and Readiness logic, you ensure that high load doesn’t cause the Pod to restart unnecessarily, which is a common Performance Monitoring pitfall.
Conclusion
Kubernetes Debugging is a multi-layered discipline that combines system administration, network engineering, and software development skills. From diagnosing basic Pod startup failures using kubectl describe to employing ephemeral containers for deep-dive Code Analysis, the tools available are powerful if used correctly.
Remember that the goal of debugging is not just to fix the immediate error but to understand the systemic cause. Is it a scheduler conflict? A network policy blocking traffic? Or a memory leak in your Node.js application? By mastering these techniques and implementing CI/CD Debugging strategies early in your pipeline, you can transform your Kubernetes cluster from a black box into a transparent, manageable system.
As you continue your journey in Cloud Native development, keep exploring tools like Prometheus for Performance Monitoring and Jaeger for tracing requests across microservices. The better your observability, the less time you will spend debugging and the more time you will spend building.