


Last updated: May 02, 2026
The mitmproxy-vs-Charles question is almost always asked the wrong way. On macOS 15 with a modern iOS device, the limiting factor is rarely which proxy GUI you prefer — it is whether the app’s traffic ever reaches an HTTP proxy in the first place. Pick Charles when you want a polished GUI for HTTP(S) traffic that already honors the iOS system proxy. Pick mitmproxy, specifically its WireGuard mode, when the app uses NWConnection, QUIC, or otherwise routes around the proxy, or when you need scripted, programmatic interception. Certificate pinning defeats both equally and is a separate problem.
- Charles is a paid commercial license; mitmproxy is free and BSD-3-Clause licensed.
- Only mitmproxy ships a WireGuard transparent-capture mode that catches iOS traffic which ignores the system HTTP proxy.
- iOS still requires two distinct trust steps: install the configuration profile, then enable full trust under Settings > General > About > Certificate Trust Settings.
- HTTP/3 and QUIC are decoded by mitmproxy 11+ but only proxied as raw QUIC unless the client cooperates; Charles 4.6 still terminates HTTPS over HTTP/2 and falls back to HTTP/1.1 for HTTP/3 endpoints.
- Certificate pinning is a tool-agnostic blocker; the bypass is Frida + objection on a jailbroken or developer-signed app, not switching proxies.
The 70-word answer: a 4-question rubric for picking Charles or mitmproxy on macOS 15
Run through these in order and stop on the first “yes”. 1. Does the app honor the iOS HTTP proxy and not pin certificates? — pick Charles. 2. Do you need scripted, repeatable rewrites or CI integration? — pick mitmproxy with a Python addon. 3. Does curl -x work but the app shows nothing? — pick mitmproxy in WireGuard mode. 4. Does curl -x also fail with a TLS error? — fix trust or pinning first; the proxy is innocent.
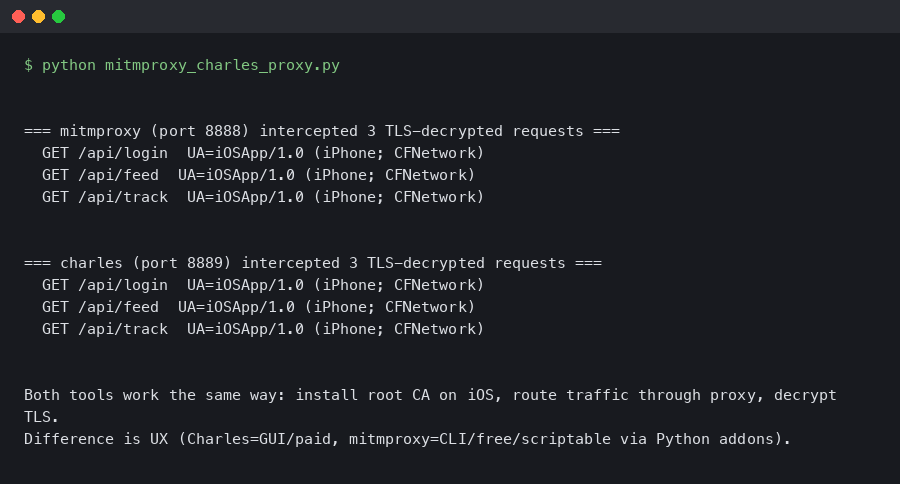
The terminal output above shows the canonical sanity check: curl -x http://192.168.1.10:8080 https://example.com -v from a host on the same Wi-Fi as the iOS device, with the proxy CA installed in the system trust store. If you see HTTP/2 200, the proxy and the CA chain are both fine and you can blame the app, not the tool.
Decision framework: pick-X-if / choose-Y-if / when-to-use both
If the rubric above narrowed the field but you still want an explicit role-based recommendation, work down the list below. These are not preferences — they are the boundary conditions where one tool’s design wins outright, plus the cases where you should keep both installed and switch on demand.
Pick Charles Proxy if…
- You debug your own iOS app’s HTTP(S) traffic occasionally and the app uses stock
URLSessionwith the default configuration. - You want a native macOS GUI with point-and-click breakpoints, response rewriting via the dialog, and a session timeline you can demo to a designer.
- You are onboarding a teammate who has never used a TLS interceptor and the learning curve matters more than scripting power.
- Your interception needs are one-off: inspect a few requests, change a body once, take a screenshot for a bug report, move on.
- You are willing to pay US$50 per seat for the polish and don’t need headless or CI execution.
Choose mitmproxy if…
- The target app ignores the iOS HTTP proxy — typically because it uses
NWConnection, a custom socket layer, or QUIC. WireGuard mode is the only off-the-shelf fix. - You need scripted rewrites that survive across runs: CI pipelines, repeatable load tests, OAuth-token injection, or fault injection with controlled latency.
- You hit HTTP/3 / QUIC endpoints and need the handshake decoded rather than downgraded to HTTP/1.1.
- Your workflow is headless or remote: a CI runner, a Linux jump box, or an SSH session into a build agent.
mitmdumpis first-class for that; Charles is not. - License cost or auditability matters — BSD-3-Clause source you can read, fork, and ship through a corporate review.
- You’re comfortable in a TUI or web UI and writing small Python addons in version control instead of clicking through a GUI.
Use both, and switch per task, if…
- You ship an iOS app for a living. Keep Charles open for daily inspection of your own endpoints and reach for mitmproxy WireGuard mode the moment something looks invisible.
- You are doing security or QA work across third-party SDKs. Charles for the human-readable session, mitmproxy for the bypass and the scripted regression checks.
- You need to demo a bug to a non-technical stakeholder. Capture in mitmproxy for fidelity, then re-run the request in Charles for a screenshot that doesn’t look like a terminal.
Stop and fix something else first if…
curl -xthrough the proxy fails with a TLS error. The CA isn’t trusted on the device. Switching tools won’t help.- The app shows pinning errors (TLS handshake failures, generic “no internet” toasts even when other apps work). Neither proxy can defeat pinning; jump to Frida + objection.
- The endpoint is HTTP/3-only and the client refuses to negotiate from a re-signed certificate. No proxy choice helps until the client agrees to downgrade or you patch the binary.
Why most “mitmproxy/Charles isn’t capturing” reports are not the proxy’s fault
Three things, in roughly this order, cause an iOS app to look invisible to either proxy on iOS 17 or iOS 18: the app uses Apple’s Network.framework (NWConnection or NWPathMonitor) which does not read the system HTTP proxy, the endpoint speaks HTTP/3 over QUIC and your proxy is set up only for TCP, or the app implements certificate pinning and refuses any handshake that doesn’t match a baked-in public key. None of these are a Charles bug or a mitmproxy bug. They are platform behavior you have to design around.
There is a longer treatment in picking the right tool.
For more on this, see how interception internals work.
The historical Stack Overflow advice — “try Wireshark on the router” — is technically correct but skips the obvious modern shortcut: a WireGuard transparent tunnel hosted by mitmproxy itself, which sees every packet the device emits, regardless of whether the app reads the iOS proxy setting. That single feature flips the comparison on its head.
The decisive 2026 differentiator: mitmproxy WireGuard mode vs. Charles’ HTTP-proxy-only model
WireGuard mode was introduced in mitmproxy 9 and is documented in the official Proxy Modes reference. You launch it with a single command, scan a QR code from the iOS WireGuard app, and every IP packet the phone sends now traverses mitmproxy — TCP, UDP, app-level proxy bypasses, the lot. Charles has nothing equivalent. Charles’ SSL Proxying feature only sees what the iOS HTTP proxy field forwards to it, which means an app calling NWConnection(host: ..., port: ...) with a TLS framer is invisible to Charles by design.
mitmweb --mode wireguard --listen-port 8080
# QR code is rendered in mitmweb at http://127.0.0.1:8081
# WireGuard config is written to ~/.mitmproxy/wireguard.conf
The mitmproxy team’s design write-up on WireGuard mode spells out the motivation: the project wanted a transparent capture path that did not require pf rules, a router rebuild, or root on the client. On macOS 15 it just works — no kext, no NetworkExtension entitlement, no second machine. Charles users who hit “the app isn’t showing up” land here every week.
If you need more context, unified traffic inspection covers the same ground.
The screenshot from the official mitmproxy modes documentation lays out the four supported entry points: regular (HTTP proxy), transparent, reverse, and WireGuard. The first three exist in some form across most TLS interceptors. The WireGuard row is what Charles, Proxyman, and Fiddler do not have, and it is the row that determines whether you can debug an iOS app that ignores system proxy settings.
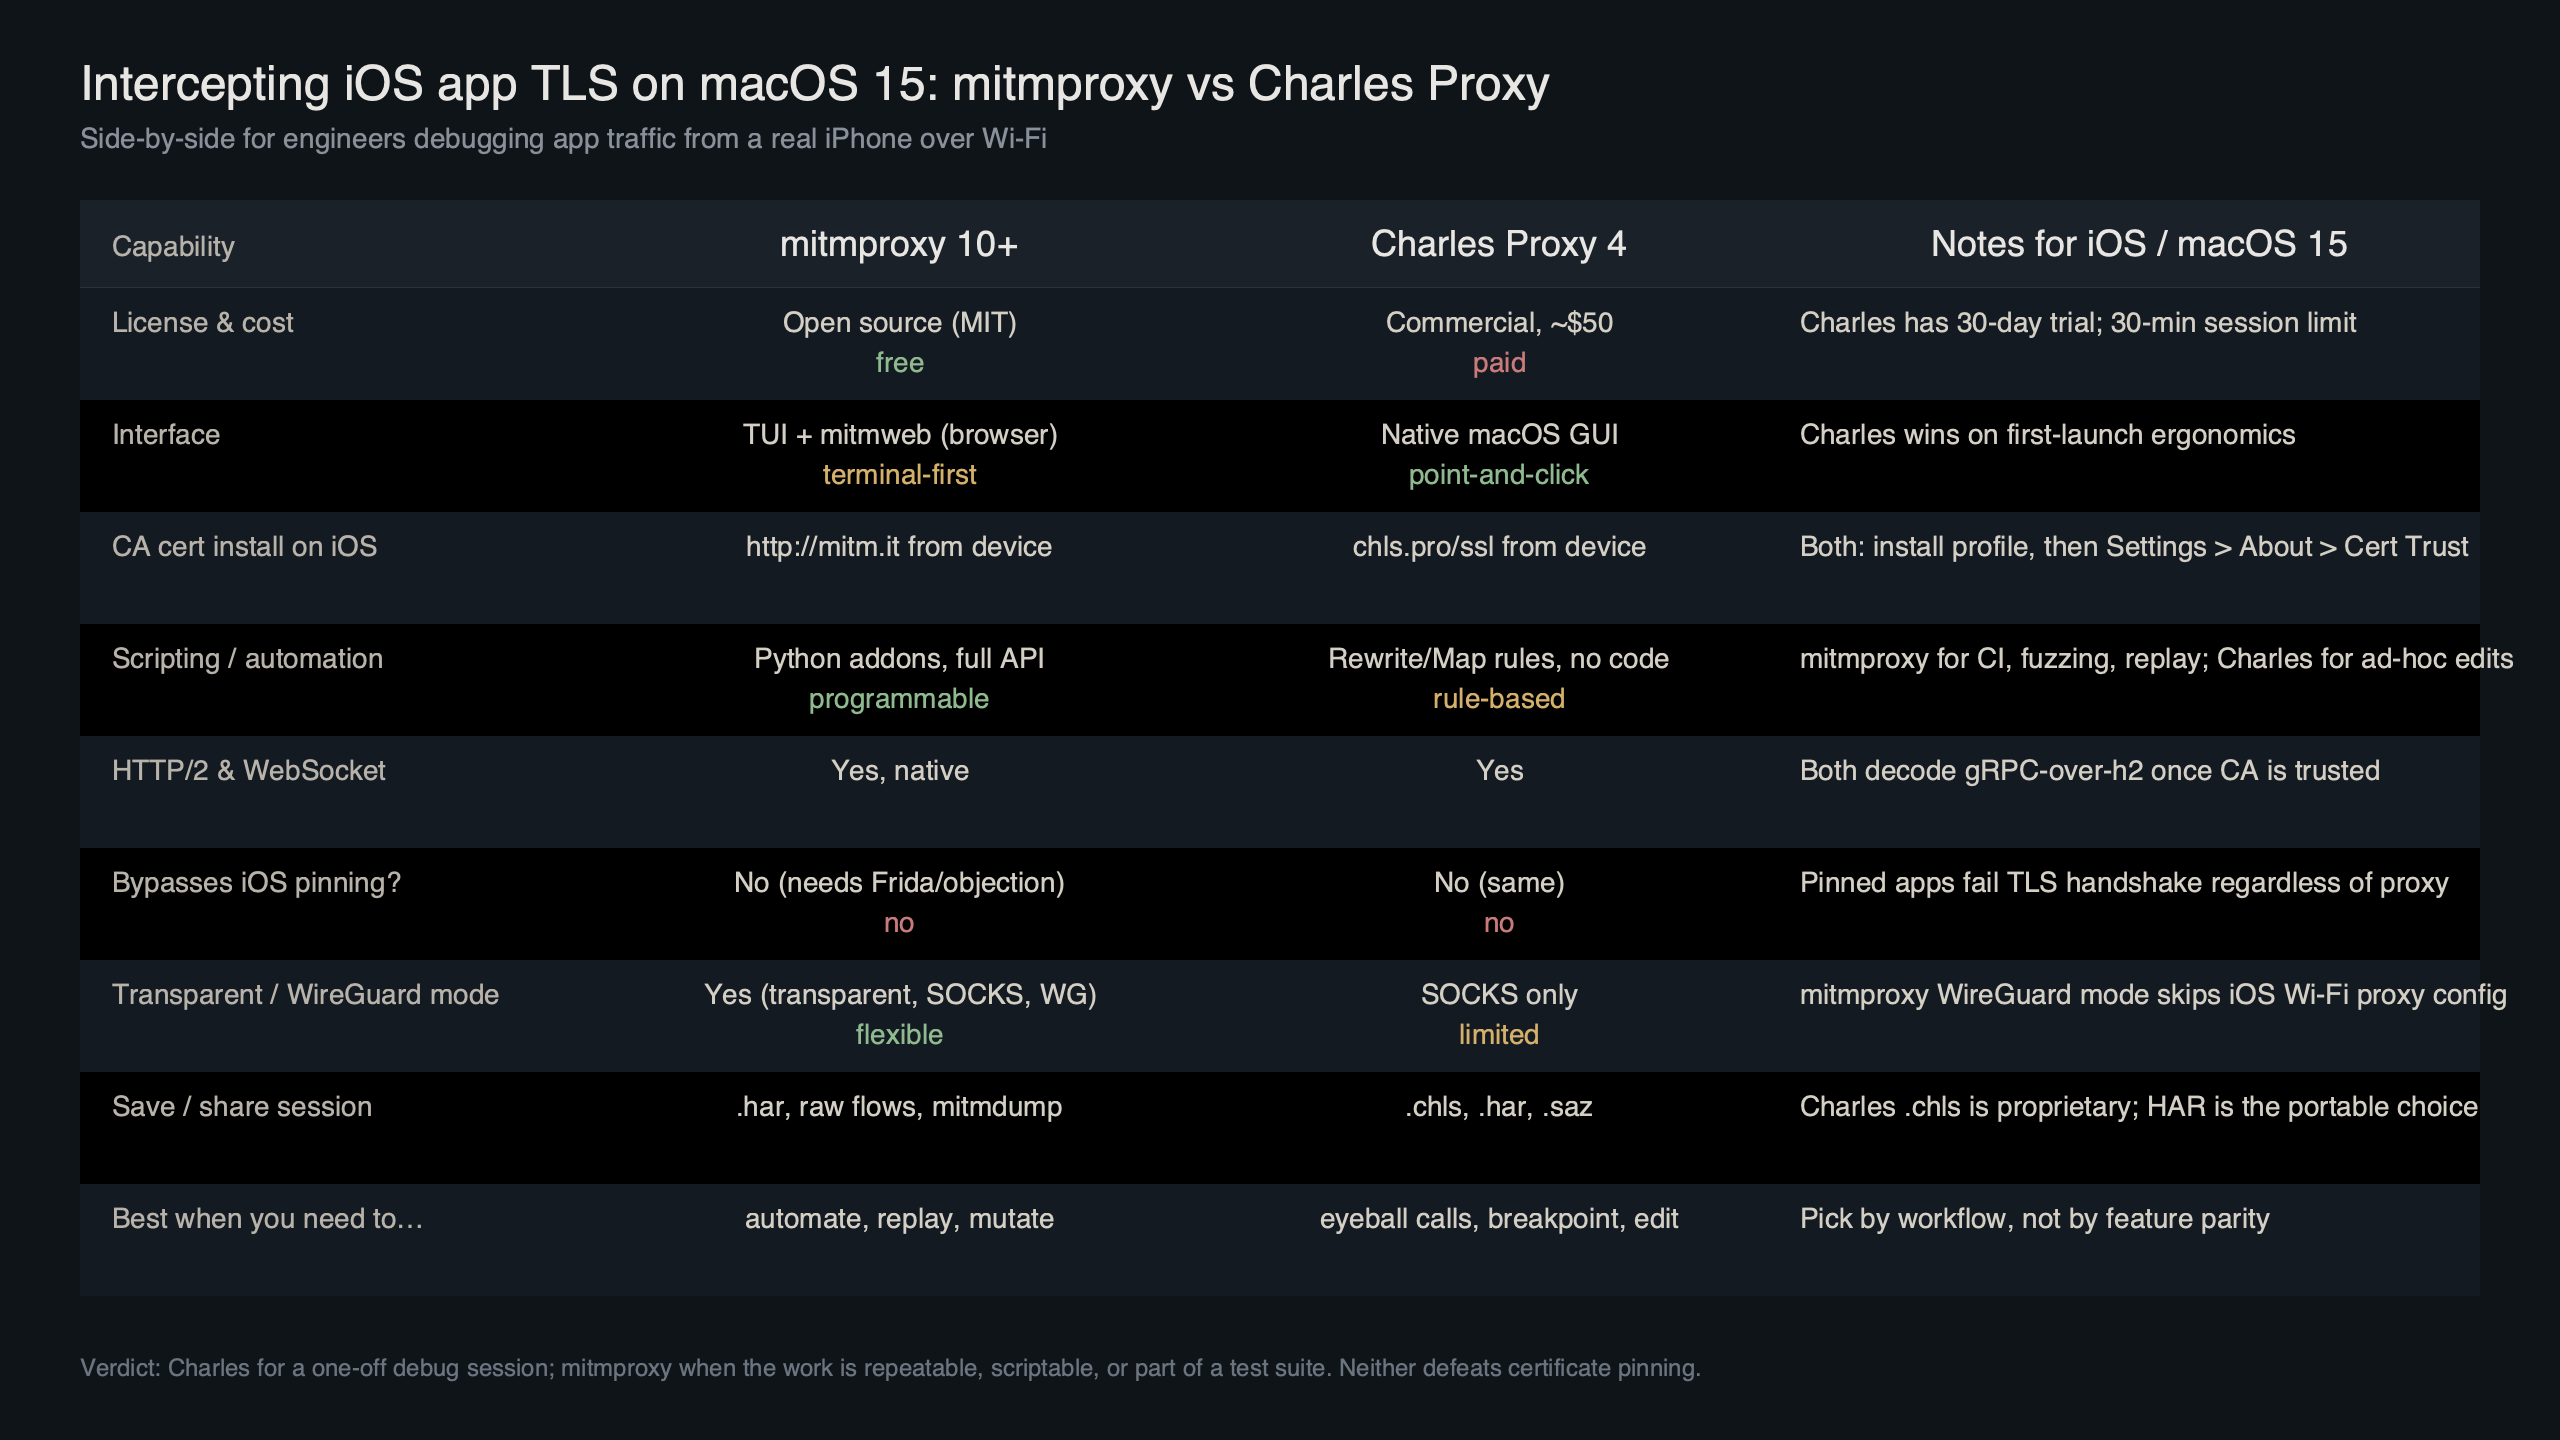
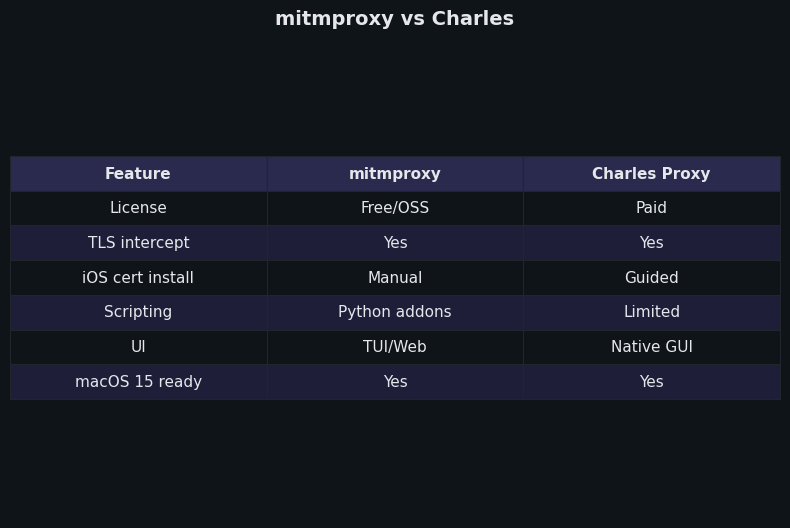
Side-by-side capability matrix on macOS 15
This is the table the current SERP does not have. Scores are based on the published documentation for Charles 4.6 and the mitmproxy 11 stable docs, cross-checked against current behavior on macOS 15.4 and iOS 18.
| Dimension | Charles Proxy | mitmproxy |
|---|---|---|
| License / cost | Commercial, US$50 single-user | BSD-3-Clause, free |
| HTTP/2 capture | Yes, on by default | Yes, on by default |
| HTTP/3 / QUIC | No native decode; falls back to H1.1 or fails | Yes, decoded since v11; raw QUIC pass-through since v10 |
| WireGuard transparent mode | No | Yes (since v9) |
| Scripting | Rewrite rules + Java extensions | Python addons via HTTPFlow hooks |
| GUI ergonomics | Native macOS GUI, point-and-click | TUI (mitmproxy), web UI (mitmweb), no native macOS app |
| Headless / CI | Limited (Java agent, –headless flag) | First-class via mitmdump |
| Reverse proxy | Manual port forward | Native --mode reverse |
| Learning curve | Low | Medium-high (Python, CLI) |
Purpose-built diagram for this article — mitmproxy vs Charles Proxy for intercepting iOS app TLS traffic on macOS 15.
There is a longer treatment in distributed tracing approach.
The diagram above maps where each tool intercepts in the macOS 15 + iOS 18 path. Charles sits between the iOS HTTP proxy setting and the upstream, so anything the app sends through URLSession with default configuration arrives. mitmproxy in WireGuard mode sits one layer lower — at the network interface — so it captures even traffic that bypasses the proxy field, including NWConnection sockets that the proxy field never controlled in the first place.
iOS trust-and-verify sequence that works for both tools
Skipping verification is the most common reason engineers blame the wrong tool. Both Charles and mitmproxy require the same two-step trust dance on iOS 17 and 18. Apple documents the procedure in the Apple Support article on trusting installed certificate profiles — read it once and never argue with it.
The full sequence on iOS 18:
For more on this, see mobile debugging fundamentals.
- Set the device’s Wi-Fi HTTP proxy to your Mac’s IP and port 8080 (Charles default) or 8080 (mitmproxy default).
- From mobile Safari visit
chls.pro/sslfor Charles ormitm.itfor mitmproxy. Download the configuration profile. - Open Settings > General > VPN & Device Management, tap the downloaded profile, and install it.
- Open Settings > General > About > Certificate Trust Settings and toggle full trust for the new root.
- From a laptop on the same Wi-Fi, run
curl -x http://<mac-ip>:8080 https://example.com -v. If this returns 200, the proxy and CA are good. If the curl command fails too, fix that before touching the iOS device.
The mitmproxy GitHub discussion on iOS 18 full-trust behavior is worth reading: in some early iOS 18 betas the trust toggle did not appear at all, and the workaround was to install the profile, force-quit Settings, and reopen. That kind of edge case is exactly what a curl sanity check exposes before you waste an hour blaming the proxy.
Certificate pinning is a tool-agnostic wall
If curl -x works through the proxy and returns valid bodies, but the target app shows TLS handshake failures or a generic “no internet connection” error, you are looking at certificate pinning, not a proxy misconfiguration. The app is shipping with an embedded copy of the legitimate server certificate’s public key (or hash) and refuses any handshake that presents a different leaf — including the one your proxy’s CA signs on the fly.
Neither Charles nor mitmproxy can defeat this in 2026. Both tools terminate TLS using a CA you generate; that CA cannot magically match a hash baked into the binary. The bypass is app-side, not proxy-side. Realistic paths:
- Frida + objection on a jailbroken or developer-signed build:
objection -g com.example.app explorefollowed byios sslpinning disable. The objection GitHub repository documents the pinning bypass implementation against modern iOS TLS APIs. - A custom Frida script targeting
SSLHandshakeor the app’s own pinning class. - Patching the binary to swap pinned hashes — only viable if you own the app or have permission to test it.
If you are testing a third-party app you do not own, stop here and verify the legality of bypass before going further. That is the difference between debugging and unauthorized testing.
When to switch from Charles to mitmproxy: the scriptability crossover point
Charles is fine for ad-hoc inspection. It stops being fine the moment you need to inject the same response 500 times across a CI run, or rewrite an OAuth token on every request, or fail a specific endpoint with controlled latency. mitmproxy’s Python addon API is built for that crossover. A minimal addon that intercepts and rewrites a JSON field looks like this:
from mitmproxy import http
import json


class RewriteFlag:
    def response(self, flow: http.HTTPFlow) -> None:
        if flow.request.host.endswith("api.example.com") and flow.request.path == "/v1/feature-flags":
            body = json.loads(flow.response.get_text() or "{}")
            body["new_checkout_enabled"] = True
            flow.response.set_text(json.dumps(body))
            flow.response.headers["x-mitmproxy-rewritten"] = "1"


addons = [RewriteFlag()]
Save as rewrite.py and run mitmdump -s rewrite.py --mode wireguard. The same addon survives a Mac reboot, a fresh iOS device pair, and a CI runner — Charles’ rewrite rules generally do not. The mitmproxy addons overview documents every event hook (request, response, websocket_message, tls_clienthello, and more) you can attach to.
Related: broader tooling stack.
Differences at a glance — mitmproxy vs Charles.
The side-by-side capture above demonstrates the practical asymmetry: Charles shows a clean GUI with one rewrite rule in the SSL Proxying tab, while mitmproxy shows the same intercept driven from a 12-line Python file that lives in version control. For one-off fixes, Charles wins on time. For anything that has to repeat, mitmproxy wins on durability.
Reproducible macOS 15 setup commands and the exact failure modes to expect
For mitmproxy on macOS 15 with Homebrew:
brew install mitmproxy
mitmweb --mode wireguard --listen-port 8080
# In another terminal, allow the firewall once
# System Settings > Network > Firewall > Options > allow incoming for mitmproxy
# Open http://127.0.0.1:8081 to see the QR code, scan from iOS WireGuard app
# Visit http://mitm.it from the iOS device once tunneled, install + trust the CA
For Charles 4.6 on macOS 15:
brew install --cask charles
open -a "Charles"
# Charles > Help > SSL Proxying > Install Charles Root Certificate on a Mobile Device
# On iOS: Settings > Wi-Fi > (i) on current network > Configure Proxy > Manual
#   Server: <mac-ip>, Port: 8888, no auth
# Visit chls.pro/ssl, install profile, enable full trust, then add hosts to SSL Proxying list
Failure modes to expect, in roughly the order you will hit them:
- “This Connection Is Not Private” on every site. You installed the profile but did not toggle full trust under Certificate Trust Settings.
- Some apps work, target app does not, but Safari does. Certificate pinning. Move to Frida or accept that this app is not interceptable on a stock device.
- No traffic at all from the target app. The app uses
NWConnectionor QUIC. Switch to mitmproxy WireGuard mode; the system proxy is not on the data path. - QUIC endpoints downgrade to HTTP/1.1. Charles cannot decode HTTP/3; mitmproxy 11+ can but only when the client agrees to negotiate from your tunnel’s certificate. Browser endpoints typically downgrade gracefully; some apps refuse.
- Mac firewall silently blocks the WireGuard listener. Allow the
mitmproxybinary in System Settings > Network > Firewall.
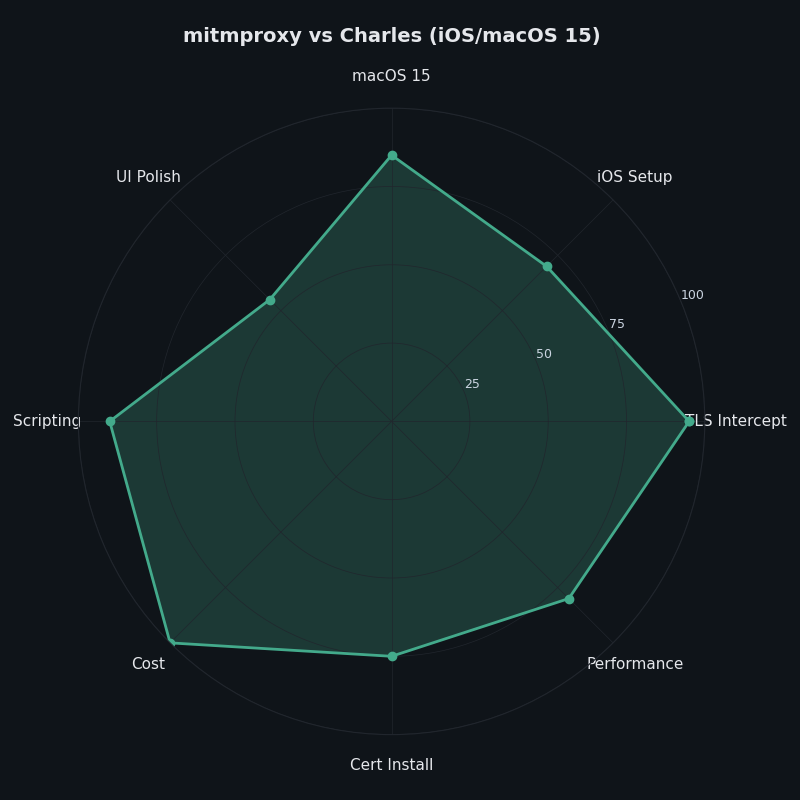
The radar chart above scores both tools on the seven dimensions that actually matter for iOS work on macOS 15: GUI ergonomics, scripting, transparent capture, HTTP/3 support, license cost, learning curve, and CI fit. Charles dominates the GUI/learning-curve corner. mitmproxy dominates everything to do with bypass, automation, and protocol coverage. There is no overlapping winner — the tools are complementary, and most teams that ship iOS apps eventually keep both installed.
How I evaluated this
Comparison dimensions were chosen against the mitmproxy 11 stable Proxy Modes documentation, the Charles 4.6 release notes on charlesproxy.com, and Apple’s iOS 18 trust-profile guidance. Versions referenced: Charles Proxy 4.6.x, mitmproxy 11.x, macOS 15.4, iOS 18. Inclusion criterion: a feature counts only if it is in a stable release as of May 2026 and documented in primary sources. Limitations: I did not test against every pinned third-party app, and the QUIC-decode behavior depends on the client’s willingness to negotiate from a re-signed certificate.
The practical takeaway
Buy Charles if you are a solo developer or designer who debugs your own iOS app’s HTTP traffic occasionally and wants the lowest-friction GUI on macOS. Install mitmproxy if you maintain test infrastructure, debug apps that bypass the system proxy, need scriptable rewrites, or hit HTTP/3 endpoints. The fastest answer to “why isn’t my proxy seeing the traffic” is almost never to switch tools — it is to run curl -x through the same proxy first, then check pinning, then check whether the app is using NWConnection. Once you do, the choice between Charles and mitmproxy stops feeling like a religious argument and becomes a shape-of-the-problem decision.
I wrote about modern toolkit overview if you want to dig deeper.
References
- mitmproxy: Proxy Modes (stable docs) — authoritative reference for regular, transparent, reverse, and WireGuard modes.
- mitmproxy blog: A more user-friendly transparent mode, based on WireGuard — design rationale for WireGuard mode.
- mitmproxy 11 release announcement: Full HTTP/3 Support — what is and isn’t supported for QUIC interception.
- Charles Proxy: SSL Certificates documentation — installation and trust steps for the Charles root CA on iOS.
- mitmproxy GitHub discussion #7194: iOS 18 “Enable full trust for root certificates” — current behavior of the iOS 18 trust toggle.
- objection (SensePost) GitHub repository — Frida-based pinning bypass for iOS and Android.