

JavaScript has evolved from a simple scripting language to the powerhouse of the modern web, driving everything from interactive front-end experiences with frameworks like React and Vue to robust back-end systems with Node.js. However, to truly master JavaScript development, one must look beyond the surface of syntax and libraries. Understanding how the JavaScript engine works under the hood is not just academic; it’s a practical necessity for writing efficient, bug-free, and predictable code. Many developers, even experienced ones, grapple with confusing behaviors related to variable scope, function execution order, and asynchronous operations.
This article provides a comprehensive deep dive into the foundational pillars of JavaScript execution. We will demystify core concepts like the Execution Context and Hoisting, which dictate how your code is parsed and run. From there, we’ll explore the practical applications of closures and DOM manipulation, bridging theory with real-world front-end development. Finally, we will tackle the complexities of asynchronous JavaScript, tracing its evolution from callbacks to the elegant async/await syntax used for modern API development. By the end, you’ll have the foundational knowledge to not only solve common JavaScript errors but also to architect more sophisticated and performant applications.
The Heart of JavaScript: Execution Context and Hoisting
Before a single line of your JavaScript code is executed, the JavaScript engine performs a crucial setup process. This process is governed by the concept of the Execution Context. Understanding this is the key to unlocking many of JavaScript’s supposed “quirks,” including hoisting.
The Two Phases of Execution: Creation and Execution
Every time JavaScript code runs, it does so inside an Execution Context. The most fundamental is the Global Execution Context (GEC), created when your script first loads. A new Function Execution Context (FEC) is created every time a function is invoked. Each context is created and processed in two distinct phases:
- Creation Phase: The engine scans the code without executing it. During this phase, it allocates memory for all variables and functions. Function declarations are stored in their entirety. Variables declared with
varare stored and initialized with a default value ofundefined. Variables declared withletandconstare also stored but remain uninitialized, which leads to the “Temporal Dead Zone” (TDZ). - Execution Phase: The engine executes the code line by line, assigning the actual values to variables and invoking functions.
These contexts are managed using a data structure called the Call Stack. When a script starts, the GEC is pushed onto the stack. When a function is called, its FEC is pushed on top. When the function finishes, its context is popped off the stack. This Last-In, First-Out (LIFO) process is fundamental to JavaScript’s single-threaded nature.
Demystifying Hoisting
Hoisting is the direct result of the Creation Phase. Because the engine allocates memory for variables and functions before execution, it gives the appearance that their declarations are “hoisted” to the top of their scope. This behavior varies significantly between var, let, const, and function declarations.
Consider this practical example that often trips up developers:
// Demonstrating hoisting behaviors
// 1. Function Declaration Hoisting
// The entire function is hoisted, so it can be called before it's defined.
sayHello();
function sayHello() {
console.log("Hello, World!");
}
// 2. 'var' Hoisting
// The declaration 'var myVar' is hoisted and initialized with 'undefined'.
console.log(myVar); // Outputs: undefined
var myVar = "I am a var";
console.log(myVar); // Outputs: "I am a var"
// 3. 'let' and 'const' in the Temporal Dead Zone (TDZ)
// The declarations are hoisted, but not initialized. Accessing them before
// the declaration line results in a ReferenceError.
try {
console.log(myLet);
} catch (error) {
console.error(error.message); // Outputs: "Cannot access 'myLet' before initialization"
}
let myLet = "I am a let";
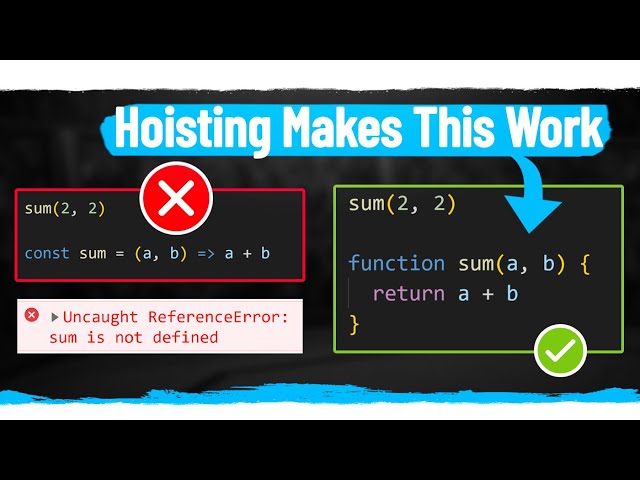
console.log(myLet); // Outputs: "I am a let"As the code shows, function declarations are fully hoisted and ready to use. Variables declared with var are hoisted but are undefined until their assignment line is reached. In contrast, let and const are hoisted but remain in the Temporal Dead Zone, making any attempt to access them before declaration a runtime error. This is a key reason modern JavaScript development best practices advocate for using let and const to avoid unexpected bugs related to hoisting.
From Theory to Practice: Scope, Closures, and the DOM
With a solid understanding of the execution context, we can now explore how JavaScript manages variable access through scope and how this enables powerful patterns like closures. We’ll then connect these concepts to practical front-end development by manipulating the Document Object Model (DOM).
Mastering Scope and the Power of Closures
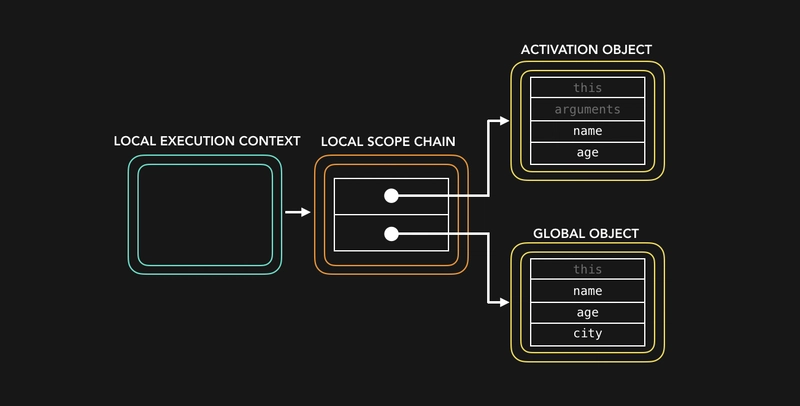
Scope determines the accessibility of variables. JavaScript has Global Scope, Function Scope, and, with the introduction of let and const, Block Scope. A closure is a fundamental concept that arises from this scoping mechanism. A closure occurs when a function “remembers” its lexical scope (the environment in which it was created), even when the function is executed outside of that original scope.
This is incredibly useful for creating private state and data encapsulation, a cornerstone of robust software design. Let’s create a simple counter factory that demonstrates this principle:
/**
 * A function factory that creates a counter.
 * The inner function forms a closure over the 'count' variable.
 */
function createCounter() {
  let count = 0; // 'count' is a private variable within the closure's scope

  // The returned object contains methods that have access to 'count'
  return {
    increment: function() {
      count++;
      console.log(`Count is now: ${count}`);
    },
    decrement: function() {
      count--;
      console.log(`Count is now: ${count}`);
    },
    getValue: function() {
      return count;
    }
  };
}

// Create two independent counters
const counterA = createCounter();
const counterB = createCounter();

counterA.increment(); // Outputs: Count is now: 1
counterA.increment(); // Outputs: Count is now: 2

counterB.increment(); // Outputs: Count is now: 1 (independent of counterA)

console.log(`Final value of counter A: ${counterA.getValue()}`); // Outputs: 2
console.log(`Final value of counter B: ${counterB.getValue()}`); // Outputs: 1

// We cannot access 'count' directly from the outside, demonstrating encapsulation.
// console.log(counterA.count); // This would be undefined.
In this example, each call to createCounter creates a new scope with its own `count` variable. The returned methods (increment, decrement, getValue) maintain a persistent reference to this scope, creating a closure. This allows them to manage a private state that is inaccessible from the outside world.
Bringing JavaScript to Life: DOM Manipulation
The primary role of JavaScript in the browser is to create dynamic and interactive user experiences. This is achieved by interacting with the Document Object Model (DOM), a tree-like representation of the HTML document. JavaScript can add, remove, and modify any element or attribute within this tree.
Let’s build a simple example that fetches data from a public API and displays it on the page when a user clicks a button. This combines DOM selection, event handling, and asynchronous operations—a common pattern in web development.
<!DOCTYPE html>
<html lang="en">
<head>
    <title>DOM API Example</title>
</head>
<body>
    <h1>User Data Fetcher</h1>
    <button id="fetch-btn">Fetch User Data</button>
    <div id="user-container"></div>

    <script>
        // JavaScript will go here
    </script>
</body>
</html>
Now, let’s add the JavaScript to make this page interactive. The code will be explained in the next section on asynchronicity.
Handling Asynchronicity: From Callbacks to Async/Await
JavaScript is single-threaded, meaning it can only execute one task at a time. This would be a major problem for tasks like network requests, which can take a long time. If the browser froze while waiting for data, the user experience would be terrible. JavaScript solves this with a non-blocking, asynchronous event-driven model powered by the Event Loop.
The Evolution of Asynchronous Code
Early asynchronous operations in JavaScript relied on callbacks—functions passed as arguments to be executed upon completion. This often led to deeply nested, hard-to-read code known as “Callback Hell.”
Promises were introduced to solve this. A Promise is an object representing the eventual completion (or failure) of an asynchronous operation. They allow you to chain operations using .then() for success and .catch() for errors, leading to more readable code.
The modern and most preferred approach is async/await. This is syntactic sugar built on top of Promises, allowing you to write asynchronous code that looks and behaves like synchronous code, making it exceptionally clean and easy to reason about. Let’s implement the logic for our DOM example using this modern syntax.
// Get references to our DOM elements
const fetchButton = document.getElementById('fetch-btn');
const userContainer = document.getElementById('user-container');

// Define an async function to fetch and display user data
const fetchUserData = async () => {
  // Use a try...catch block for robust error handling
  try {
    userContainer.textContent = 'Loading...';

    // 'await' pauses the function execution until the Promise resolves
    const response = await fetch('https://jsonplaceholder.typicode.com/users/1');

    // Check if the network request was successful
    if (!response.ok) {
      throw new Error(`HTTP error! Status: ${response.status}`);
    }

    // 'await' again to parse the JSON body of the response
    const userData = await response.json();

    // Render the data to the DOM
    renderUser(userData);

  } catch (error) {
    // If any part of the 'try' block fails, the error is caught here
    console.error('Failed to fetch user data:', error);
    userContainer.textContent = `Error: ${error.message}`;
    userContainer.style.color = 'red';
  }
};

// A helper function to render the user data into the container
const renderUser = (user) => {
  userContainer.style.color = 'black';
  userContainer.innerHTML = `
    <h3>${user.name} (@${user.username})</h3>
    <p><strong>Email:</strong> ${user.email}</p>
    <p><strong>Website:</strong> ${user.website}</p>
  `;
};

// Add an event listener to the button to trigger the fetch
fetchButton.addEventListener('click', fetchUserData);
In this code, the async keyword marks fetchUserData as an asynchronous function. The await keyword pauses the function’s execution until the fetch Promise is settled. This prevents the code from trying to process data that hasn’t arrived yet, all without blocking the main thread. The try...catch block provides a clean and standard way to handle any potential network or parsing errors during the process, which is a crucial part of API debugging and building resilient applications.

Best Practices and Modern JavaScript Tooling
Writing functional code is only the first step. Writing clean, maintainable, and performant code requires adhering to best practices and leveraging the powerful ecosystem of web development tools available today.
Writing Clean and Maintainable Code
- Prefer
constandlet: Always default toconstfor variables that won’t be reassigned. Useletonly when you know a variable’s value needs to change. Avoidvarto prevent hoisting-related bugs and scope confusion. - Use Strict Mode: Begin your scripts with
'use strict';. This opt-in mode enforces stricter parsing and error handling, catching common coding mistakes and preventing the use of “unsafe” features. - Linting and Formatting: Integrate tools like ESLint and Prettier into your workflow. ESLint analyzes your code to find and fix stylistic and programmatic errors, while Prettier automatically formats your code for consistency across your team. This significantly improves code quality and readability.
- Code Analysis: Both static analysis (linting) and dynamic analysis (profiling in the browser) are key to catching issues early.
Essential JavaScript Development Tools
- Browser Developer Tools: Tools like Chrome DevTools or Firefox Developer Tools are indispensable. They are your command center for JavaScript debugging, allowing you to set breakpoints, step through code, inspect the call stack, analyze network requests, and profile performance. Mastering the debug console is a non-negotiable skill.
- Frameworks and Libraries: For building complex single-page applications (SPAs), frameworks like React, Vue, and Angular provide structured, component-based architectures that simplify state management and UI rendering.
- Node.js: For back-end development, Node.js allows you to run JavaScript on the server, enabling you to build full-stack applications with a single language. Debugging in this environment often involves tools like the built-in Node.js Inspector or the debugger in IDEs like VS Code.
- TypeScript: A superset of JavaScript that adds static types. TypeScript helps catch errors during development rather than at runtime, making it an excellent choice for large-scale applications where type safety and code maintainability are paramount.
Conclusion
True proficiency in JavaScript development goes deeper than knowing the latest framework. It’s built on a solid understanding of the language’s core mechanics. We’ve journeyed from the foundational concepts of the Execution Context and Hoisting to the practical application of closures, DOM manipulation, and modern asynchronous patterns with async/await. We’ve seen how these concepts are not just theoretical but have a direct impact on the code we write every day, influencing its predictability, robustness, and clarity.
By internalizing how JavaScript creates and executes code, you empower yourself to debug more effectively, architect more resilient applications, and write code that is easier for you and your team to reason about. The next step is to apply this knowledge. Use the debugger in your browser’s developer tools to step through an async function. Refactor an old project that uses callbacks to use Promises or async/await. By actively engaging with these concepts, you will solidify your understanding and elevate your skills as a modern JavaScript developer.